Introduction
After spending the better part of a weekend writing a specialized Windows driver for the purposes of allowing me to communicate with the Hyper-V hypervisor, as well as the Secure Kernel, from user-mode, I realized that there was a dearth of concise technical content on non-PnP driver development, and especially on how the Windows Driver Foundation (WDF) fundamentally changes how such drivers can be developed.
While I’ll eventually release my full tool, once better polished, on GitHub, I figured I’d share some of the steps I took in getting there. Unlike my more usual low-level super-technical posts, this one is meant more as an introduction and tutorial, so if you already consider yourself experienced in WDF driver development, feel free to wait for Part 2.
Writing a Traditional Non-PnP Driver
Having written non-PnP Windows Driver Model (WDM) style drivers for almost two decades, it’s almost become a mechanized skill that allows me to churn out a basic driver (and associated user-mode client application) in less than 15 minutes, where I always find myself following the same basic recipe:
- Write the DriverEntry and DriverUnload function, including creating a device object, naming it, ACL’ing it correctly, and then creating a Win32 symbolic link under \DosDevices
- Stub out an IRP_MJ_CREATE, IRP_MJ_CLOSE and IRP_MJ_DEVICE_CONTROL handler
- Define some IOCTLs as METHOD_BUFFERED, to be safe
- Implement the IRP_MJ_CREATE/IRP_MJ_CLOSE handlers to always return success and complete the IRP
- Do the right IO_STACK_LOCATION manipulation in the IOCTL handler and use the appropriate WDM macros to read, parse, and complete the request(s)
- Write a user-mode tool that calls CreateFile and then DeviceIoControl to communicate to the driver
- Either use Sc.exe on the command-line to create a kernel-mode service entry and then start/stop the driver as needed, or write the equivalent C Code using CreateService, StartService and StopService
Countless online tutorials and updated samples on GitHub from Microsoft (such as those part of the Windows Driver Kit) explain these steps in detail for the curious minded — but this post isn’t about rehashing that, it’s about looking at the new.
I had long heard how the Windows Driver Foundation (WDF) is meant to provide a much easier model for writing true hardware device drivers — including, in Windows 10, allowing mostly cross-compilable user-mode drivers (vs. the older framework which required writing the driver in C++/COM).
But I had wrongly assumed that for writing Non-PnP research/academic drivers (or even for production), WDM was still the better, and easier choice. For example, I don’t know of a single anti-malware tool whose filter drivers are WDF based — and in fact, the framework is poorly suited for such use (or NDIS Light-Weight Filters (LWF), or Windows Filtering Platform (WFP) callout drivers, or etc…).
The truth is that, unless you’re truly plugging into some OS filtering stack still focused on WDM, a simple “process some IOCTLs” driver can be much more easily written in WDF, and the installation/uninstallation process can also be made more robust by following certain principles.
Writing a Modern “Non-PnP” Driver
With WDF — and more specifically, its kernel counterpart, the Kernel Mode Driver Framework (KMDF) — you’ll have two options at your disposal for writing a simple non-hardware driver that communicates with a user-space client (and note that KMDF was back-ported all the way back to Windows 2000, so this isn’t some sort of new Windows 10 functionality):
- You can write a true non-PnP driver by setting the correct flag on your WDF Driver Object, manually creating your WDF Device as a “Control Device”, naming it, creating the Win32 symbolic link, and securing it with an ACL. You don’t need an IRP_MJ_CREATE or IRP_MJ_CLOSE handler, and can immediately write your IOCTL handler. You must still provide a DriverUnload routine.
- Or you can develop a “root bus-enumerated” PnP driver by providing a simple .INF file, provide an AddDevice routine, and have WDF automatically call that when your ‘device’ is detected. In your AddDevice routine, construct an unnamed WDF Device, register an interface with a custom GUID (you can also do this in the INF and avoid a few extra lines of code), and provide your IOCTL handler. You do not need an IRP_MJ_CREATE, IRP_MJ_CLOSE, or IRP_MJ_PNP/IRP_MJ_POWER handler, and must still provide a DriverUnload routine.
While these two options appear similar, there is one crucial difference — in the first implementation, you must manually register, load, and unload this driver every time you wish to talk with it from user-mode. If you leave it loaded, the user’s only choice is to manually run command-line tools like Sc.exe or Net.exe to unload it. Without using forensic tools, the debugger, or power tools, the user does not know your driver is loaded. You must pick a static name for your device, and hope it does not collide with anyone else’s device name.
In the second implementation, your driver is registered with the system as a PnP driver that is automatically detected by virtue of being on the “root bus”. This means users see it in Device Manager, and can easily interrogate it for information, disable it, and even uninstall it. To communicate with your driver, your application uses a custom GUID that you’ve defined, and enumerates an interface associated with it — a much stricter and unique protocol than relying on a string. Such a driver can also be more easily signed by Microsoft’s Windows Hardware Quality Lab (WHQL) infrastructure, and can attest to its security better than a raw non-PnP driver without an .INF or .CAT file.
Clearly, for a pure “proof-of-concept” driver, the benefits of the second implementation may not seem worth writing an extra INF file and learning some new SetupAPI functions instead of CreateService. But for something a little more polished, more generally usable, a root bus-enumerated driver, is in my opinion, the way to go.
It’s worth noting that WDF doesn’t invent this concept, but what finally makes it (in my opinion) reachable to the researcher masses, is that unlike in WDM, where this option required 1500-4000 lines of boiler-plate PnP code to be correctly enumerated, installed, uninstalled, disabled, interrogated, and more, there is literally zero additional work required when using WDF — again, no IRP_MJ_PNP handler, no WMI, no Power Management, and none of the things you may have seen if you have ever attempted this in your past.
In fact, strictly speaking, it’s actually less line of code to write a root-bus enumerated PnP driver than a non-PnP driver, with the caveat that the latter needs an INF file. But let’s be honest, once you’ve written one, you can largely copy-paste it — and if you ever wanted to have your driver signed by Microsoft, you’ll need an INF anyway.
Interacting with a Root-Enumerated PnP Driver
Because you are not statically naming your device driver, and because it must be PnP enumerated, the user-mode code looks a bit different than the traditional way to install and talk to a non-PnP driver. There are 2 steps that might be new to you:
- Installing the driver is done by first creating a “fake” device node under the root bus. Typically, true hardware device drivers are installed when the PnP manager discovers a physical device on the machine, interrogates it and builds a unique device instance path for it (containing, among other things, information such as Device ID and/or Vendor ID), and finds a matching driver that is registered with some combination/part of that device instance path (through its INF file). In our case, we will manually create a device node pretending that PnP detected such a “device” on the root bus, and we will manually name this node in the exact same way our INF file indicates, while claiming that this “device” is of the same device class our INF file indicates.
- After we’ve created this fake device node, we’ll point Windows at our INF file, and tell it to do an update/refresh of the PnP device tree — which will make it discover our fake device node, see that there’s a perfectly matching INF that describes it, and load the indicated driver!
If this sounds scary and a lot of code — let me re-assure you: we are talking about 3 APIs and less than 20 lines of code, as you’ll shortly see in the sample code below!
Now that the driver has been installed, unless your code (or the user/some other code) uninstalls it, it will remain persistent on the system, and automatically reloaded every boot. In fact, if you repeat the steps above even in the face of an already-installed copy of the driver, you will simply be creating yet another fake device node, and load another copy of your driver.
Therefore, we must solve our last hurdle — figuring out if our driver is already loaded — both so that we can avoid multiple re-installations, as well as so we can figure out how to communicate with it from user-mode. This is achieved by using that device interface GUID that we mentioned a driver should register:
- First, begin by checking if there are any devices that expose our custom device interface GUID. If not, then our driver is not loaded, which means we must perform the installation steps described.
- If so, this will return a device interface data structure, which we can then query to obtain a device instance path name. This name can then directly be passed to CreateFile in order to obtain a handle to the device object and send IOCTLs.
Behind the scenes, what really happens is that the “unnamed” WDF/PnP device object that was created does actually have a name — say, for example \Device\0000005c (if you’ve seen such devices in your WinObj or WinDbg before, now you know what they are). In turn, under the \DosDevices namespace (aka \GLOBAL??), the I/O manager did create a symbolic link — but based on a string representation of the unique device instance path. The API that queries the device interface data mentioned in step #2 above essentially does this lookup, and returns that symbolic link.
Once again, while this may also sound like a lot of complex code, it’s actually achieved by a single API call and less than a dozen lines of code (and that includes error handling), as you’re about to see below!
Finally, you may also want to provide the option (or automatically do this every time your user-mode tool exits) to uninstall the driver. In this situation, we use the SetupAPI calls to enumerate for our device class GUID (instead of our interface GUID), and once found, we pass that information to the same installer API, but a different parameter that handles uninstallation in this situation.
With only 3 APIs and another 20 lines of code, the driver is automatically unloaded assuming there’s no longer any handles (otherwise, it will be unloaded when the handles are closed and/or when the machine reboots), and uninstalled from Device Manager so that the device node is not found and matched again at the next boot.
Sample Code
Enough theory — let’s take a look at a very simple root-bus enumerated driver to see the code in practice, including how the INF file should look like. Then, we’ll see how the associated user-mode client application looks like, and how it can install, uninstall, and communicate with our device by finding its interface and opening a handle to it.
DriverEntry and DriverUnload Routines
First, our DriverEntry function looks a bit different than in WDM, as we are not touching the DRIVER_OBJECT in any way. Instead, we use a WDF_DRIVER_CONFIG structure to initialize our AddDevice routine and our Unload routine, then use WdfDriverCreate to initialize a WDF Driver Object on top of the WDM/NT DRIVER_OBJECT.
NTSTATUS
DriverEntry (
    _Inout_ PDRIVER_OBJECT DriverObject,
    _In_ PUNICODE_STRING RegistryPath
    )
{
    NTSTATUS status;
    WDF_DRIVER_CONFIG config;

    //
    // Initialize our Driver Configuration, specifying an unload
    // routine and an AddDevice routine (making us a PnP driver)
    //
    WDF_DRIVER_CONFIG_INIT(&config, DeviceAdd);
    config.EvtDriverUnload = DriverUnload;

    //
    // Create the WDF Driver Object
    //
    status = WdfDriverCreate(DriverObject,
                             RegistryPath,
                             WDF_NO_OBJECT_ATTRIBUTES,
                             &config,
                             WDF_NO_HANDLE);
    if (!NT_SUCCESS(status))
    {
        DbgPrintEx(DPFLTR_IHVDRIVER_ID,
                   DPFLTR_ERROR_LEVEL,
                   "WdfDriverCreate fail: %lx\n",
                   status);
    }

    //
    // Return back to OS
    //
    return status;
}
The DriverUnload function works just like in the WDM world, except that from now on, all routines (except the DriverEntry) will be receiving a WDFDRIVER, not a DRIVER_OBJECT.
VOID
DriverUnload (
    _In_ WDFDRIVER Driver
    )
{
    UNREFERENCED_PARAMETER(Driver);
    PAGED_CODE();

    //
    // Nothing to do for now
    //
    NOTHING;
}
AddDevice Routine
This is where, traditional PnP WDM drivers would create their DEVICE_OBJECT and do PCI/bus scanning and/or identification to confirm this is a device they can handle. Additional initialization would then usually happen in the driver’s IRP_MN_START_DEVICE handler as part of their IRP_MJ_PNP handler. But as we are not a true hardware driver, these concerns do not affect us.
Instead, in the WDF world, the only things we have to worry about are creating a WDF Device Object, register a custom device interface GUID so that we can talk to our device from user mode, and initialize a WDF Queue Object, which is how we’ll be able to receive IRPs — in our case, we register an IOCTL handler for IRP_MJ_DEVICE_CONTROL.
A WDF queue can either be serialized or parallelized, and we don’t have any specific restrictions that prevent multiple client apps from talking with us concurrently (but if we wanted to prevent that, we could).
DEFINE_GUID(HyprFuzzGuid,
            0x4056adb2,
            0x8e4e,
            0x4b6a,
            0x88, 0x2e, 0xff, 0x1, 0xc, 0x3a, 0x1c, 0x63);

NTSTATUS
AddDevice (
    _In_ WDFDRIVER Driver,
    _In_ PWDFDEVICE_INIT DeviceInit
    )
{
    NTSTATUS status;
    WDFDEVICE device;
    WDF_IO_QUEUE_CONFIG queueConfig;
    WDFQUEUE queue;
    UNREFERENCED_PARAMETER(Driver);

    //
    // Create a WDF Device
    //
    status = WdfDeviceCreate(&DeviceInit,
                             WDF_NO_OBJECT_ATTRIBUTES,
                             &device);
    if (!NT_SUCCESS(status))
    {
        DbgPrintEx(DPFLTR_IHVDRIVER_ID,
                   DPFLTR_ERROR_LEVEL,
                   "WdfDeviceCreate fail: %lx\n",
                   status);
        goto Exit;
    }

    //
    // Create a device interface so that UM can talk with us
    //
    status = WdfDeviceCreateDeviceInterface(device,
                                            &HyprFuzzGuid,
                                            NULL);
    if (!NT_SUCCESS(status))
    {
        DbgPrintEx(DPFLTR_IHVDRIVER_ID,
                   DPFLTR_ERROR_LEVEL,
                   "WdfDeviceCreateDeviceInterface fail: %lx\n",
                   status);
        goto Exit;
    }

    //
    // Create a queue that handles IOCTLs
    //
    WDF_IO_QUEUE_CONFIG_INIT_DEFAULT_QUEUE(&queueConfig,
                                    WdfIoQueueDispatchParallel);
    queueConfig.EvtIoDeviceControl = IoDeviceControl;
    status = WdfIoQueueCreate(device,
                              &queueConfig,
                              WDF_NO_OBJECT_ATTRIBUTES,
                              &queue);
    if (!NT_SUCCESS(status))
    {
        DbgPrintEx(DPFLTR_IHVDRIVER_ID,
                   DPFLTR_ERROR_LEVEL,
                   "WdfIoQueueCreate fail: %lx\n",
                   status);
        goto Exit;
    }

Exit:
    return status;
}
Device I/O Control (IOCTL) Routine
Well, that’s almost it! At this point, the only missing piece is the IOCTL handler which will consume request from user-mode.
With WDF, you do not need to worry about I/O Stack Locations, and the various macros to copy, skip, switch these locations. In addition, instead of having a generic IRP handler which requires you to manually read the appropriate arguments in the I/O Stack Location, each WDF event callback contains specifically the data associated with this request, making development easier.
An additional benefit of WDF is that regardless of the IOCTL mechanism, APIs exist to grab the input buffer and length, so that you do not have to remember which field in the IRP contains the input and output buffers.
VOID
IoDeviceControl (
    _In_ WDFQUEUE Queue,
    _In_ WDFREQUEST Request,
    _In_ SIZE_T OutputLength,
    _In_ SIZE_T InputLength,
    _In_ ULONG IoControlCode
    )
{
    NTSTATUS status;
    PVOID inBuffer;
    PVOID outBuffer;
    ULONG_PTR resultLength;
    PAGED_CODE();
    UNREFERENCED_PARAMETER(Queue);

    //
    // Assume we won't return anything
    //
    resultLength = 0;
    inBuffer = NULL;
    outBuffer = NULL;

    //
    // Grab the input buffer (this will fail if it's 0 bytes)
    //
    status = WdfRequestRetrieveInputBuffer(Request,
                                           InputLength,
                                           &inBuffer,
                                           NULL);
    if (!NT_SUCCESS(status))
    {
        DbgPrintEx(DPFLTR_IHVDRIVER_ID,
                   DPFLTR_ERROR_LEVEL,
                   "WdfRequestRetrieveInputBuffer fail: %lx\n",
                   status);
        goto Exit;
    }

    //
    // Grab the output buffer (this will fail if it's 0 bytes)
    //
    status = WdfRequestRetrieveOutputBuffer(Request,
                                            OutputLength,
                                            &outBuffer,
                                            NULL);
    if (!NT_SUCCESS(status))
    {
        DbgPrintEx(DPFLTR_IHVDRIVER_ID,
                   DPFLTR_ERROR_LEVEL,
                   "WdfRequestRetrieveOutputBuffer fail: %lx\n",
                   status);
        goto Exit;
    }

    //
    // Handle the possible IOCTLs
    //
    switch (IoControlCode)
    {
        case IOCTL_ISSUE_HYPER_CALL:
        {
            //
            // Implement this
            //
            status = STATUS_SUCCESS;
            break;
        }

        default:
        {
            DbgPrintEx(DPFLTR_IHVDRIVER_ID,
                       DPFLTR_ERROR_LEVEL,
                       "Invalid IOCTL: %lx\n",
                       IoControlCode);
            status = STATUS_INVALID_DEVICE_REQUEST;
            break;
        }
    }

Exit:
    //
    // Return back to caller
    //
    WdfRequestCompleteWithInformation(Request,
                                      status,
                                      resultLength);
}
The INF File
The last step in a proper WDF driver is having an INF file that marks us as a root-enumerated driver, sets a strong security descriptor, and populates some strings and icons for the user to see in their Device Manager.
The key part is the Device Class GUID, which we’ll need to remember for the installation of our driver, and the device node name, which here is Root\VtlBrdge. Everything else you see is mostly boilerplate, or done for readability and UI purposes.
[Version]
DriverVer = 01/15/2019,10.30.45.805
signature="$WINDOWS NT$"
Class=FuzzerClass
CatalogFile=vtlbrdge.cat
ClassGuid={0D833DAE-8619-11D3-C19B-B60B0E0FD4AB}
Provider=%Mfg%

[SourceDisksNames]
1=%DiskId%

[SourceDisksFiles]
vtlbrdge.sys = 1

[ClassInstall32]
AddReg=FuzzerClass

[FuzzerClass]
HKR,,,,%ClassName%
HKR,,Icon,,-8
HKR,,Security,,"D:P(A;;GA;;;SY)(A;;GA;;;BA)"

[DestinationDirs]
SYS.CopyList=10,system32\drivers

[Manufacturer]
%Mfg%=AlexIonescu,NTAMD64

[AlexIonescu.NTAMD64]
%DeviceDesc% = VtlBrdgeInstall, Root\VtlBrdge

[VtlBrdgeInstall]
CopyFiles=SYS.CopyList

[SYS.CopyList]
vtlbrdge.sys

[VtlBrdgeInstall.Services]
AddService = VtlBrdge,2,VtlBrdgeInstall_Service_Inst

[VtlBrdgeInstall_Service_Inst]
ServiceType   = 1
StartType     = 3
ErrorControl  = 1
LoadOrderGroup = "Base"
ServiceBinary = %12%\vtlbrdge.sys

[Strings]
Mfg = "Alex Ionescu (@aionescu)"
DeviceDesc = "VTL Bridge and Hyper Call Connector"
DiskId = "Install disk (1 of 1)"
ClassName = "Fuzzer Devices"
So now we have a fully working driver that we are ready to talk to from user-mode, let’s look at how we can install our driver, obtain a handle to communicate with it, and finally, uninstall it.
Installing the Driver
First, installing the driver is a simple matter of creating the fake root device node, then pointing Windows at the INF to bind with it and load our driver. The trick is referencing the same device class GUID as in the INF, as well as the same root device instance path, as we mentioned above.
Note that there are more complex APIs that you can use to automatically parse the INF and extract this information if you’re dealing with someone else’s driver, but you ought to know (and hardcode) your own GUID and instance path for your own driver, in my opinion.
DEFINE_GUID(FuzzerClassGuid,
            0xd833dae,
            0x8619,
            0x11d3,
            0xc1, 0x9b, 0xb6, 0xb, 0xe, 0xf, 0xd4, 0xab);

LPWSTR g_DevPath = L"Root\\VtlBrdge\0\0";

LPWSTR g_InfPath = L"C:\\vtlbrdge\\vtlbrdge.inf";

DWORD
HvFuzzInstallDevice (
    VOID
    )
{
    HDEVINFO hDevInfo;
    SP_DEVINFO_DATA devInfo;
    BOOL bReboot, bRes;
    DWORD dwError;
    DWORD dwPathLen;

    //
    // Create a device info list for our class GUID
    //
    hDevInfo = SetupDiCreateDeviceInfoList(&FuzzerClassGuid,
                                           NULL);
    if (hDevInfo == INVALID_HANDLE_VALUE)
    {
        dwError = GetLastError();
        printf("SetupDiCreateDeviceInfoList fail: %lx\n",
               dwError);
        goto Exit;
    }

    //
    // Construct a device information structure for this device
    //
    ZeroMemory(&devInfo, sizeof(devInfo));
    devInfo.cbSize = sizeof(devInfo);
    bRes = SetupDiCreateDeviceInfo(hDevInfo,
                                   L"FuzzerClass",
                                   &FuzzerClassGuid,
                                   L"Fuzzer Class Devices",
                                   NULL,
                                   DICD_GENERATE_ID,
                                   &devInfo);
    if (bRes == FALSE)
    {
        dwError = GetLastError();
        printf("SetupDiCreateDeviceInfo fail: %lx\n",
               dwError);
        goto Exit;
    }

    //
    // Add the hardware ID for this specific fuzzing device
    //
    dwPathLen = ((DWORD)wcslen(g_DevPath) + 3) * sizeof(WCHAR);
    bRes = SetupDiSetDeviceRegistryProperty(hDevInfo,
                                            &devInfo,
                                            SPDRP_HARDWAREID,
                                            (LPBYTE)g_DevPath,
                                            dwPathLen);
    if (bRes == FALSE)
    {
        dwError = GetLastError();
        printf("SetupDiSetDeviceRegistryProperty fail: %lx\n",
               dwError);
        goto Exit;
    }

    //
    // Create the "fake" root device node for the device
    //
    bRes = SetupDiCallClassInstaller(DIF_REGISTERDEVICE,
                                     hDevInfo,
                                     &devInfo);
    if (bRes == FALSE)
    {
        dwError = GetLastError();
        printf("SetupDiCallClassInstaller fail: %lx\n",
               dwError);
        goto Exit;
    }

    //
    // Now install the INF file for the fuzzing device.
    //
    // It will be root enumerated because of the device node
    // that we created above, resulting in the driver loading.
    //
    bRes = UpdateDriverForPlugAndPlayDevices(NULL,
                                             g_DevPath,
                                             g_InfPath,
                                             INSTALLFLAG_FORCE,
                                             &bReboot);
    if (bRes == FALSE)
    {
        dwError = GetLastError();
        printf("UpdateDriverForPlugAndPlayDevices fail: %lx\n",
               dwError);
        goto Exit;
    }

    dwError = ERROR_SUCCESS;
Exit:
    return dwError;
}
Opening a Handle to the Driver
Next, or rather, typically, even before attempting installation, we must obtain a handle to our device, checking if anyone exposes our device interface GUID on this system, and if so, obtaining the symbolic link name of the interface and creating a file handle to it. Here, we must use the GUID of our device interface, not that of the device class.
DEFINE_GUID(HyprFuzzGuid,
            0x4056adb2,
            0x8e4e,
            0x4b6a,
            0x88, 0x2e, 0xff, 0x1, 0xc, 0x3a, 0x1c, 0x63);

DWORD
HvFuzzGetHandle (
    _Outptr_ PHANDLE phFuzzer
    )
{
    CONFIGRET cr;
    DWORD dwError;
    WCHAR pwszDeviceName[MAX_DEVICE_ID_LEN];
    HANDLE hFuzzer;

    //
    // Assume failure
    //
    *phFuzzer = NULL;

    //
    // Get the device interface -- we only expose one
    //
    pwszDeviceName[0] = UNICODE_NULL;
    cr = CM_Get_Device_Interface_List((LPGUID)&HyprFuzzGuid,
                                      NULL,
                                      pwszDeviceName,
                                      _countof(pwszDeviceName),
                                      CM_GET_DEVICE_INTERFACE_
                                      LIST_PRESENT);
    if (cr != CR_SUCCESS)
    {
        dwError = GetLastError();
        printf("CM_Get_Device_Interface_List fail: %lx\n",
               dwError);
        goto Exit;
    }

    //
    // Make sure there's an actual name there
    //
    if (pwszDeviceName[0] == UNICODE_NULL)
    {
        dwError = ERROR_NOT_FOUND;
        goto Exit;
    }

    //
    // Open the device
    //
    hFuzzer = CreateFile(pwszDeviceName,
                         GENERIC_WRITE | GENERIC_READ,
                         FILE_SHARE_READ | FILE_SHARE_WRITE,
                         NULL,
                         OPEN_EXISTING,
                         FILE_ATTRIBUTE_NORMAL,
                         NULL);
    if (hFuzzer == INVALID_HANDLE_VALUE)
    {
        dwError = GetLastError();
        printf("CreateFile fail: %lx\n",
               dwError);
        goto Exit;
    }

    //
    // Return a handle to the device
    //
    *phFuzzer = hFuzzer;
    dwError = ERROR_SUCCESS;
Exit:
    return dwError;
}
Uninstalling the Driver
Either by offering it up as a user action in a command-line tool, or doing it every single time your user-mode application exists, you may want to uninstall the driver without prompting the user to use Device Manager to do so. This is a simple matter of enumerating our driver to find it (this time using the device class GUID) and calling the same SetupAPI function as for installation, but with the DIF_REMOVE parameter instead.
DWORD
HvFuzzUninstallDevice (
    VOID
    )
{
    BOOL bRes;
    DWORD dwError;
    HDEVINFO hDevInfo;
    SP_DEVINFO_DATA devData;

    //
    // Open the device info list for our class GUID
    //
    hDevInfo = SetupDiGetClassDevs(&FuzzerClassGuid,
                                   NULL,
                                   NULL,
                                   0);
    if (hDevInfo == INVALID_HANDLE_VALUE)
    {
        dwError = GetLastError();
        printf("SetupDiGetClassDevs fail: %lx\n",
               dwError);
        goto Exit;
    }

    //
    // Locate our class device
    //
    ZeroMemory(&devData, sizeof(devData));
    devData.cbSize = sizeof(devData);
    bRes = SetupDiEnumDeviceInfo(hDevInfo, 0, &devData);
    if (bRes == FALSE)
    {
        dwError = GetLastError();
        printf("SetupDiEnumDeviceInfo fail: %lx\n",
               dwError);
        goto Exit;
    }

    //
    // Uninstall it
    //
    bRes = SetupDiCallClassInstaller(DIF_REMOVE,
                                     hDevInfo,
                                     &devData);
    if (bRes == FALSE)
    {
        dwError = GetLastError();
        printf("SetupDiCallClassInstaller fail: %lx\n",
               dwError);
        goto Exit;
    }

    dwError = ERROR_SUCCESS;
Exit:
    return dwError;
}
Conclusion
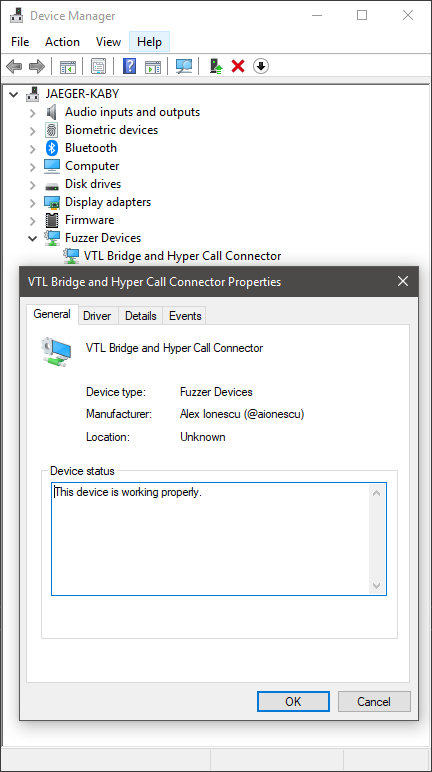
Now that you’ve written up both the driver code and application code, checking if everything works is fairly simple. Once the installation path executes, a nicely visible entry in Device Manager will show up as per below, with the various strings we specified in our INF file.
Furthermore, due to the negative Icon ID (-8) we specified in our INF file, this instructs Device Manager to look up Icon Group 8 in the resource section of SetupApi.dll, which I thought matched quite well with the “VTL Bridge and Hyper Call Connector” device we are trying to represent. I used Resource Hacker to go over the resources, since the icons are not formally documented anywhere. Note that using a positive Icon ID results in Device Manager looking up the resource in your driver binary (or DLL co-installer).
And, once your application is talking to the driver, you’ll see a handle to some “unnamed”, or rather, as we’ve seen, a numbered device object, thanks to the instance path symbolic link exposed by our interface. By using hfiref0x’s great WinObjEx64 tool, you can easily see it, as in the screenshot below.
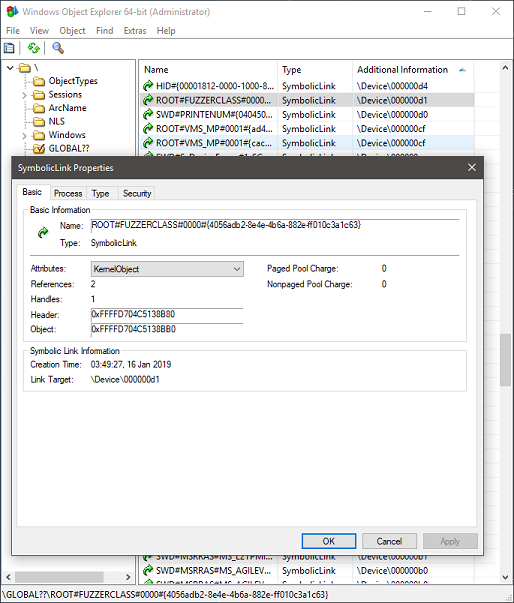
The astute reader may notice that this instance path is a simple combination of the root bus name, the device class name, an instance identifier for the device (0000), followed by the GUID of the HyprFuzz device interface we defined in our code above. As such, while not recommended, you can theoretically directly try to open a handle to your driver by hard-coding this information, but going through the appropriate API is certainly nicer.
This concludes Part 1 — while I apologize that no meaty technical details about Hyper-V were present, I still do hope that this content/tutorial was useful to some of the more junior readers, and check back next week for Part 2, where we’ll go over in detail into some hypervisor internals!